Core Concept
At a high level, integrating payments into your system involves a 3-step process:1
Create a Payment Request
Create a payment request from your server using the HitPay API.
2
Present the Checkout Page
Redirect the customer to the checkout URL or embed the Drop-in UI.
3
Handle Webhooks
Receive and validate webhook notifications to confirm payment.
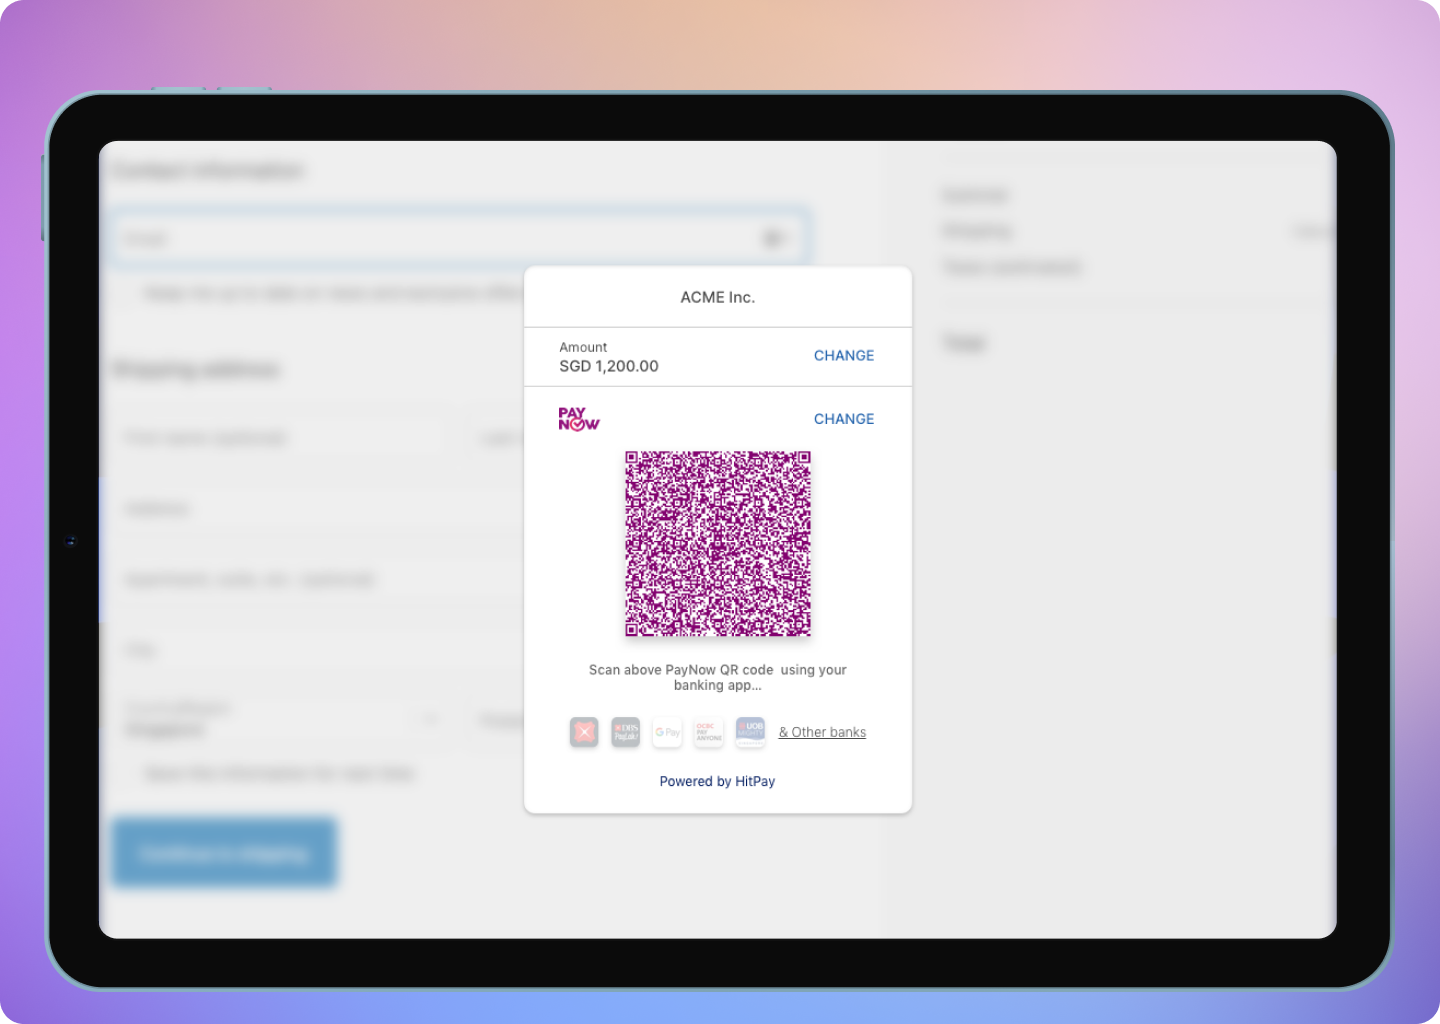
Want to skip the hosted checkout? Use Embedded Payments to render QR codes directly in your UI or redirect customers to a payment provider’s page (GrabPay, Touch ‘n Go, GCash) via a direct link — no HitPay checkout page involved.
Authentication: All API requests require your API key in the header. You can find your key in the HitPay Dashboard under Settings > API Keys.
Step 1: Create Payment Request
This is the first step of the payment flow, once you have all the details from the user and are ready to collect payments, use this API to create a payment request. Since this is a server-to-server communication, if you have a mobile or Web client that communicates with your REST API, you must have a new endpoint E.g. /create-order, or reuse an existing endpoint. This endpoint will be responsible for making the payment request API call to hitpay.Endpoint
- Sandbox
- Production
Request Parameters
Mandatory fields are
amount and currency. Remember to include header Content-Type: application/x-www-form-urlencodedResponse
Step 2: Presenting the Checkout UI
After the payment request is completed, your server must return thepayment_request_id and URL values to the client. There are 2 ways to present the checkout UI: “Redirect to HitPay checkout” or “Present Drop-In UI.”
- Option 1: Redirect to HitPay Checkout
- Option 2: Present the Drop-In UI
Navigate your user to the URL, and HitPay will take care of the rest of the flow. Once the payment is completed, the user will be navigated back to the “redirect_url” that was configured during the payment request step, along with the status.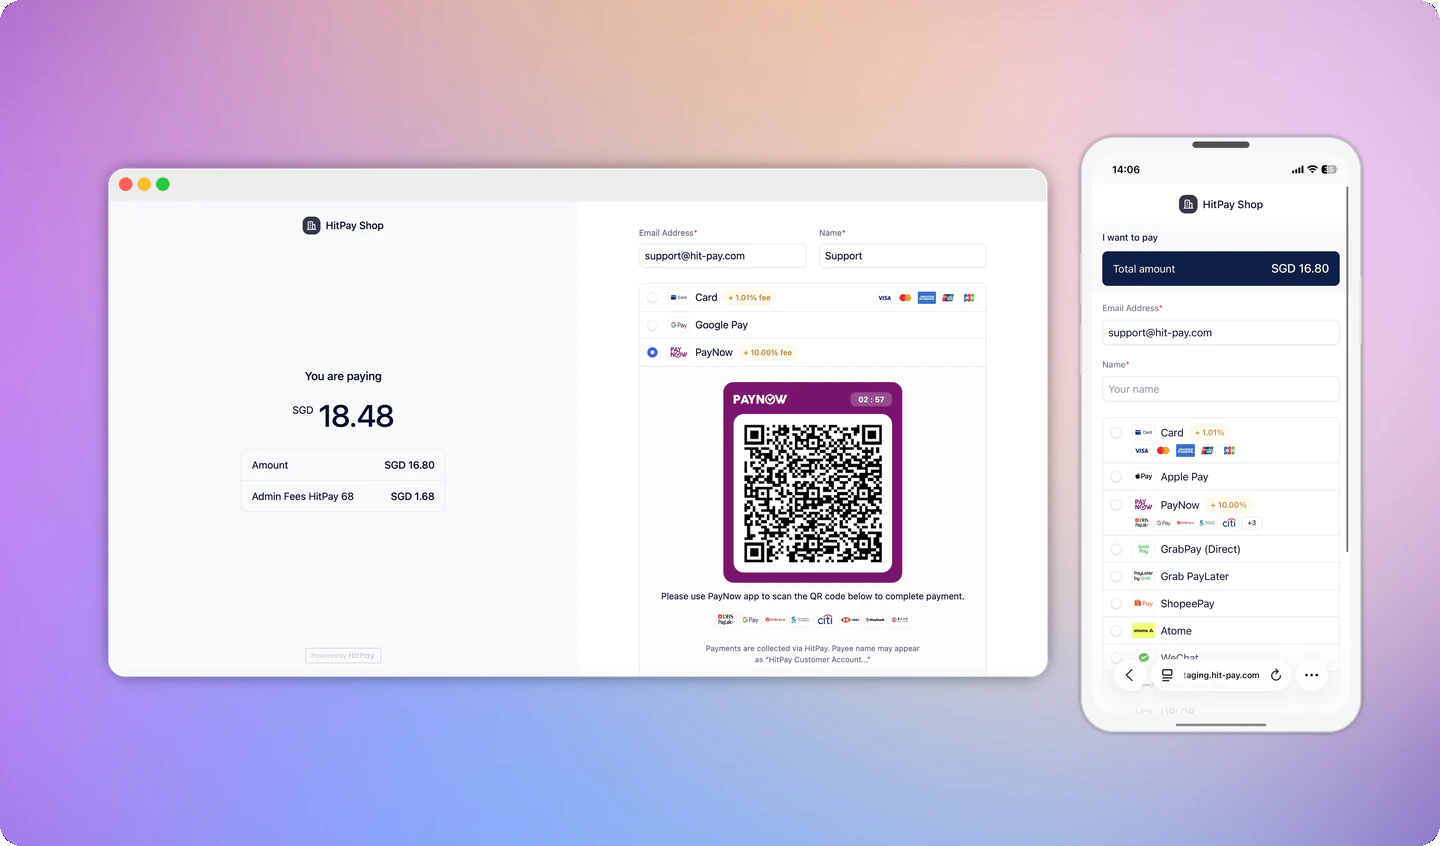
Step 3: Handle Successful Payment
Once the payment is completed, the user will be redirected to theredirect_url defined in step 1. While you can use this redirect to show an “Order Success” screen to your users, you should not rely on it alone to mark orders as paid. The redirect_url can be triggered by anyone, so always use webhooks to securely confirm payment before fulfilling orders.
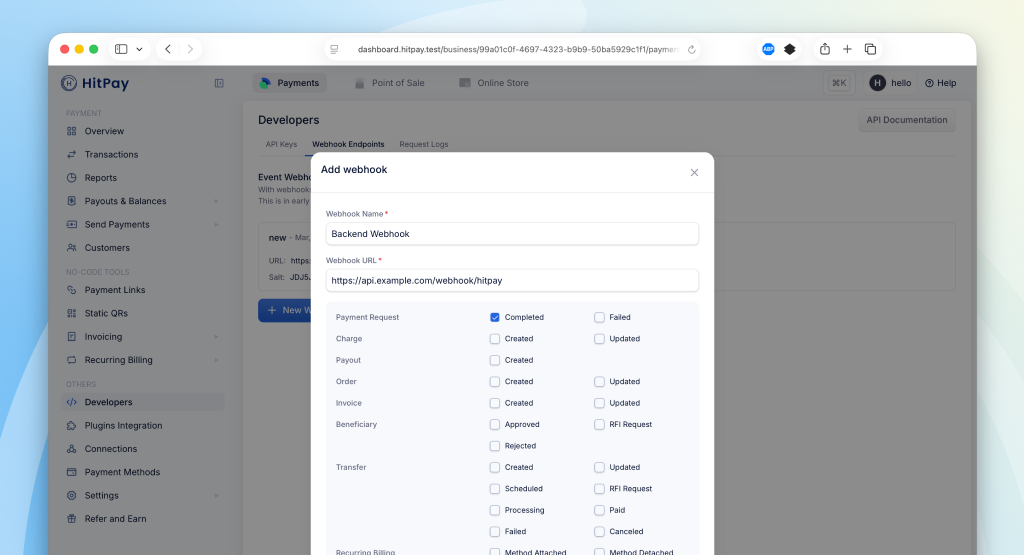
What is a Webhook?
Webhook is a POST request sent from HitPay’s server to your server about the payment confirmation. If you are using HitPay APIs to integrate into your e-commerce checkout, you must mark your order as paid ONLY after the webhook is received and validated.Register Your Webhook
To receive payment notifications, you need to register a webhook URL from your HitPay Dashboard:- Navigate to Developers > Webhook Endpoints in your dashboard
- Click on New Webhook
- Enter a name and your webhook URL
- Select the
payment_request.completedevent - Save your webhook configuration
Webhook Payload
When a payment is completed, HitPay sends a JSON payload to your registered webhook URL with the following headers:Sample Webhook Payload
Validating the Webhook
To ensure the webhook is authentic, validate theHitpay-Signature header:
- Receive the JSON payload and
Hitpay-Signaturefrom the request - Use your salt value (from the dashboard) as the secret key
- Compute HMAC-SHA256 of the JSON payload using your salt
- Compare the computed signature with
Hitpay-Signature- they must match
FAQs
Do I pass a webhook URL in the API request?
Do I pass a webhook URL in the API request?
No. The
webhook parameter in the payment request API is deprecated and should not be used.Instead, register your webhook URL from the HitPay Dashboard:- Go to Developers > Webhook Endpoints
- Click New Webhook and enter your URL
- Subscribe to
payment_request.completedand any other events you need
Webhook Signature Mismatch?
Webhook Signature Mismatch?
Possible reasons for signature mismatch:
- Ensure you are using the correct salt value from the correct environment (Sandbox or Production)
- Make sure you are computing the HMAC-SHA256 of the raw JSON payload
- Verify the signature is being read from the
Hitpay-Signatureheader
Facing Invalid Business API Key Error
Facing Invalid Business API Key Error
Possible reasons for this error:
- You are using a production key in the sandbox or a sandbox key in production. Make sure the API base URL is correct.
- You are missing headers. Ensure that you include both the ‘Content-Type’ and ‘X-Requested-With’ headers. Refer to this section again.
How do I handle cancelled or abandoned QR code payments?
How do I handle cancelled or abandoned QR code payments?
QR code payments (PayNow, GrabPay, etc.) cannot be cancelled once generated — unlike card payments, there is no cancel endpoint. Even if the user leaves your checkout page, they may have already scanned or screenshotted the QR code.Recommended approach:
- When you generate a QR code, record the creation timestamp and treat the payment as "pending" on your end.
- If you do not receive a successful payment webhook within 10–15 minutes of QR creation, you can safely assume the payment was abandoned and cancel the order on your side.
- PayNow QR codes are valid for 5 minutes — this is the window in which the customer must scan the code.
- However, once scanned, the customer's banking app may still allow them to complete the payment after the 5-minute mark.
- A 10–15 minute buffer from QR creation accounts for this delay.
Product Checklist
Product Checklist
Ensure the following before moving to production
- Change the base URL for all API calls to https://api.hit-pay.com/v1/
- Finish paynow and other payment methods set up in production
- Update API keys and Salt values from the production dashboard
- If you are using Drop-In UI, update the default link to the production URL
API Rate Limits
API Rate Limits
HitPay enforces the following rate limits to ensure optimal performance and prevent abuse:
- General API Rate Limit: 400 requests per minute across all endpoints
- Payment Request Endpoint: 70 requests per minute (additional limit to prevent payment request misuse)
Why does my charges `webhook status` show as failed?
Why does my charges `webhook status` show as failed?
If you are using a payment plugin, after every successful payment, a webhook is sent to your store to acknowledge the payment confirmation. Your order is marked as paid through this webhook.A webhook status showing as "failed" indicates that Hitpay failed to communicate with your server. This can happen for the following reasons:
- Your store may have a security feature that blocked Hitpay's request.
- Your server was unavailable during this time.
- Production:
3.1.13.32,52.77.254.34 - Sandbox:
54.179.156.147