

Overview
HitPay provides event webhooks that are HTTP post requests triggered after key events that happen on the hitpay platform. These webhooks can be used to build your own automation and processes.List of Events
These are the list of events you can listen to| Event Name | When does it trigger? |
|---|---|
| charge.created | Once a payment is successfully completed |
| charge.updated | Once a payment is refunded / partially refunded |
| payout.created | Once a payout is successfully completed |
| order.created | Once an order is created successfully |
| order.updated | Once an order status is updated |
| invoice.created | Once the invoice is created |
| transfer.created | Once the transfer is created |
| transfer.updated | Once the transfer is updated |
| transfer.processing | Once the transfer is processed |
| transfer.scheduled | Once the transfer is scheduled |
| transfer.paid | Once the transfer is paid |
| transfer.failed | Once the transfer is failed |
| transfer.canceled | Once the transfer is canceled |
| payment_request.completed | Once the payment request has been paid |
| payment_request.failed | Once the payment request received an error |
| recurring_billing.method_attached | Once a payment method is attached to a subscription |
| recurring_billing.method_detached | Once a payment method (APMs) is detached from a subscription |
| recurring_billing.subscription_updated | Once a subscription is updated, including status changes (active, cancelled, paused, expired) and edits made via the dashboard |
Register Your Webhook
The first thing you need to do before you can receive the webhook is to register the URL. Navigate to “API Keys” and enter the name and the URL you wish to receive the webhook. The URL must use HTTPS and resolve to a public destination. Loopback and private network addresses are rejected. The same rules apply toPOST /v1/webhook-events and PUT /v1/webhook-events/{webhook_event_id}.
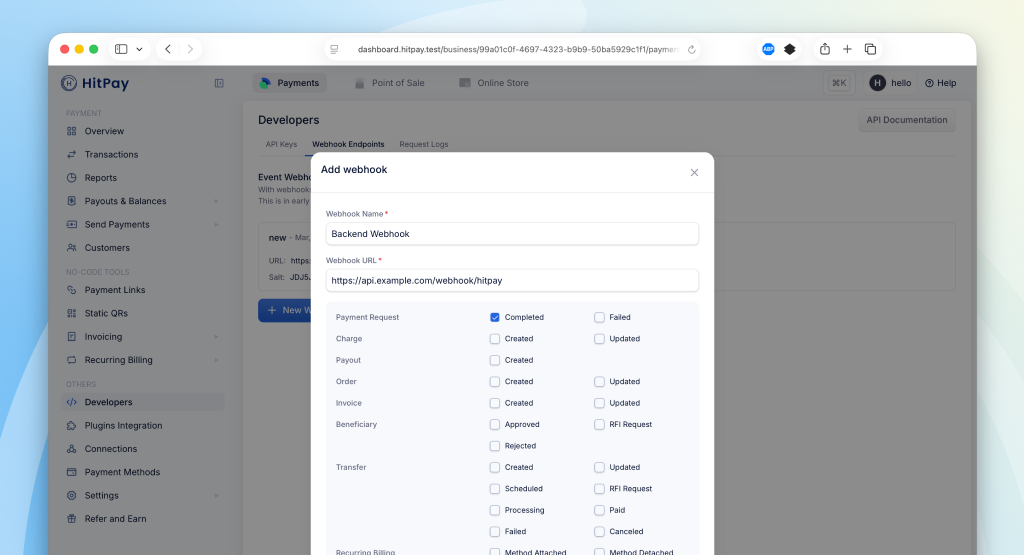
Platform webhooks
Converting to a Platform Account does not automatically start sending webhooks. The platform must register webhook endpoints on its own HitPay account first. For sub-account payments created via Platform APIs (requests include bothX-BUSINESS-API-KEY for the sub-account and X-PLATFORM-KEY for the platform):
- Successful/failed charge events (
charge.created,charge.failed,charge.updated) are delivered to webhook endpoints registered on the platform account — not the sub-account’s endpoints. - The payload is for the sub-account’s transaction; use the charge or payment-request data (and
business_idin the payload) to identify which sub-account it belongs to. - Payment request events (
payment_request.completed,payment_request.failed) are currently sent to the sub-account’s registered webhook endpoints.
Webhook Payload
Headers that are included in the webhook HTTP POST request| HTTP header | details |
|---|---|
| Hitpay-Signature | HMAC-SHA256 of the raw JSON body, using that webhook endpoint’s salt |
| Hitpay-Event-Type | created / updated based on the event |
| Hitpay-Event-Object | The type of object. It can be charge/payout/invoice/order/transfer |
| User-Agent | HitPay v2.0 |
Hitpay-Event-Objectto determine the object type of webhooks for charge payout invoice order transfer
Event examples for charge invoice order
{
  "id": "9e9a3451-a3e5-4fc5-9dfc-bc75e67c8808",
  "business_id": "98567029-f559-49f9-916b-042a4255b32a",
  "channel": "point_of_sale",
  "customer_id": "9b3503bd-fd04-4e39-9271-b2bc26fa5c96",
  "status": "succeeded",
  "customer": {
    "name": "Miss Vincent Marquardt",
    "email": "test@gmail.com",
    "phone_number": "666",
    "address": {
      "street": null,
      "city": null,
      "state": null,
      "postal_code": null,
      "country": null
    }
  },
  "currency": "sgd",
  "amount": 913.84,
  "refunded_amount": 0,
  "refunded_at": null,
  "fixed_fee": 0,
  "discount_fee": 0,
  "discount_fee_rate": 0,
  "failed_reason": null,
  "order": {
    "id": "9e9a344b-2c04-44f4-b521-e36dce8f4ade",
    "order_display_number": 2766,
    "business_id": "98567029-f559-49f9-916b-042a4255b32a",
    "channel": "point_of_sale",
    "version": "2.0",
    "customer_id": "9b3503bd-fd04-4e39-9271-b2bc26fa5c96",
    "business_customer_id": "9b3503bd-fd04-4e39-9271-b2bc26fa5c96",
    "customer": {
      "name": "Miss Vincent Marquardt",
      "email": "test@gmail.com",
      "phone_number": "666",
      "address": {
        "street": null,
        "building": null,
        "street_2": null,
        "city": null,
        "state": null,
        "postal_code": null,
        "country": null
      }
    },
    "customer_pickup": false,
    "currency": "sgd",
    "order_discount_name": null,
    "status": "completed",
    "remark": null,
    "created_at": "2025-04-05T19:09:54+08:00",
    "updated_at": "2025-04-05T19:09:59+08:00",
    "closed_at": "2025-04-05T19:09:59+08:00",
    "location_id": "9e42e6be-2ff8-4b37-ac14-07970d2e79ca",
    "location": null,
    "business_user_id": "1306",
    "slot_date": null,
    "slot_time": null,
    "messages": null,
    "products": [],
    "charges": [],
    "line_items": [
      {
        "id": "9e9a344c-7b3c-4330-8926-0f9df43c3b08",
        "name": "POS TESTING - BLue",
        "thumbnail": null,
        "item_type": "product",
        "quantity": 1,
        "related_id": "9e4b75c4-cce6-4f08-ab71-abf8907f41a4",
        "unit_price": 913.84,
        "line_item_amount": 913.84,
        "item_unit_weight": 883,
        "params": null,
        "children": []
      }
    ],
    "order_form_response": null,
    "coupon": null,
    "pickup": null,
    "payment_status": "paid",
    "fulfilment_status": "completed",
    "fulfilment_type": "in_store",
    "line_items_total": 913.84,
    "order_discount_amount": 0,
    "line_item_discount_amount": 0,
    "line_item_tax_amount": 0,
    "additional_discount_amount": 0,
    "total_discount_amount": 0,
    "line_item_price": 913.84,
    "shipping_amount": 0,
    "total_coupon_amount": 0,
    "amount": 913.84,
    "subtotal": 913.84
  },
  "order_id": "9e9a344b-2c04-44f4-b521-e36dce8f4ade",
  "remark": null,
  "payment_intents": [],
  "payment_request_id": null,
  "payment_request": null,
  "all_inclusive_fee": null,
  "home_currency": null,
  "payment_provider": {
    "code": "hitpay",
    "account_id": "98567029-f559-49f9-916b-042a4255b32a",
    "charge": {
      "type": "business_charge",
      "id": "9e9a3451-a3e5-4fc5-9dfc-bc75e67c8808",
      "method": "cash",
      "transfer_type": null,
      "details": null,
      "logo": "/icons/payment-methods-2/cash.png"
    }
  },
  "created_at": "2025-04-05T19:09:59+08:00",
  "updated_at": "2025-04-05T19:10:01+08:00",
  "closed_at": "2025-04-05T19:09:59+08:00",
  "location_id": "9e42e6be-2ff8-4b37-ac14-07970d2e79ca",
  "location": {
    "id": "9e42e6be-2ff8-4b37-ac14-07970d2e79ca",
    "name": "API_Location_1740101762910",
    "address": "58 Izpod Parkway, Singapore, Singapore, sg, 079903"
  },
  "business_user_id": "1306",
  "business_user_display": "TestingSG",
  "terminal_id": null,
  "relatable": null
}
{
  "id": "9e9a3451-a3e5-4fc5-9dfc-bc75e67c8808",
  "business_id": "98567029-f559-49f9-916b-042a4255b32a",
  "channel": "point_of_sale",
  "customer_id": "9b3503bd-fd04-4e39-9271-b2bc26fa5c96",
  "status": "partially_refunded",
  "customer": {
    "name": "Miss Vincent Marquardt",
    "email": "test@gmail.com",
    "phone_number": "666",
    "address": {
      "street": null,
      "city": null,
      "state": null,
      "postal_code": null,
      "country": null
    }
  },
  "currency": "sgd",
  "amount": 913.84,
  "refunded_amount": 200,
  "refunded_at": "2025-04-05T19:12:39+08:00",
  "fixed_fee": 0,
  "discount_fee": 0,
  "discount_fee_rate": 0,
  "failed_reason": null,
  "order": {
    "id": "9e9a344b-2c04-44f4-b521-e36dce8f4ade",
    "order_display_number": 2766,
    "business_id": "98567029-f559-49f9-916b-042a4255b32a",
    "channel": "point_of_sale",
    "version": "2.0",
    "customer_id": "9b3503bd-fd04-4e39-9271-b2bc26fa5c96",
    "business_customer_id": "9b3503bd-fd04-4e39-9271-b2bc26fa5c96",
    "customer": {
      "name": "Miss Vincent Marquardt",
      "email": "test@gmail.com",
      "phone_number": "666",
      "address": {
        "street": null,
        "building": null,
        "street_2": null,
        "city": null,
        "state": null,
        "postal_code": null,
        "country": null
      }
    },
    "customer_pickup": false,
    "currency": "sgd",
    "order_discount_name": null,
    "status": "completed",
    "remark": null,
    "created_at": "2025-04-05T19:09:54+08:00",
    "updated_at": "2025-04-05T19:12:39+08:00",
    "closed_at": "2025-04-05T19:09:59+08:00",
    "location_id": "9e42e6be-2ff8-4b37-ac14-07970d2e79ca",
    "location": null,
    "business_user_id": "1306",
    "slot_date": null,
    "slot_time": null,
    "messages": null,
    "products": [],
    "charges": [],
    "line_items": [
      {
        "id": "9e9a344c-7b3c-4330-8926-0f9df43c3b08",
        "name": "POS TESTING - BLue",
        "thumbnail": null,
        "item_type": "product",
        "quantity": 1,
        "related_id": "9e4b75c4-cce6-4f08-ab71-abf8907f41a4",
        "unit_price": 913.84,
        "line_item_amount": 913.84,
        "item_unit_weight": 883,
        "params": null,
        "children": []
      }
    ],
    "order_form_response": null,
    "coupon": null,
    "pickup": null,
    "payment_status": "partially_refunded",
    "fulfilment_status": "completed",
    "fulfilment_type": "in_store",
    "line_items_total": 913.84,
    "order_discount_amount": 0,
    "line_item_discount_amount": 0,
    "line_item_tax_amount": 0,
    "additional_discount_amount": 0,
    "total_discount_amount": 0,
    "line_item_price": 913.84,
    "shipping_amount": 0,
    "total_coupon_amount": 0,
    "amount": 913.84,
    "subtotal": 913.84
  },
  "order_id": "9e9a344b-2c04-44f4-b521-e36dce8f4ade",
  "remark": null,
  "payment_intents": [],
  "payment_request_id": null,
  "payment_request": null,
  "all_inclusive_fee": null,
  "home_currency": null,
  "payment_provider": {
    "code": "hitpay",
    "account_id": "98567029-f559-49f9-916b-042a4255b32a",
    "charge": {
      "type": "business_charge",
      "id": "9e9a3451-a3e5-4fc5-9dfc-bc75e67c8808",
      "method": "cash",
      "transfer_type": null,
      "details": null,
      "logo": "/icons/payment-methods-2/cash.png"
    }
  },
  "created_at": "2025-04-05T19:09:59+08:00",
  "updated_at": "2025-04-05T19:12:39+08:00",
  "closed_at": "2025-04-05T19:09:59+08:00",
  "location_id": "9e42e6be-2ff8-4b37-ac14-07970d2e79ca",
  "location": {
    "id": "9e42e6be-2ff8-4b37-ac14-07970d2e79ca",
    "name": "API_Location_1740101762910",
    "address": "58 Izpod Parkway, Singapore, Singapore, sg, 079903"
  },
  "business_user_id": "1306",
  "business_user_display": "TestingSG",
  "terminal_id": null,
  "relatable": null
}
{
  "id": "9e9a344b-2c04-44f4-b521-e36dce8f4ade",
  "order_display_number": 2766,
  "business_id": "98567029-f559-49f9-916b-042a4255b32a",
  "channel": "point_of_sale",
  "version": "2.0",
  "customer_id": "9b3503bd-fd04-4e39-9271-b2bc26fa5c96",
  "business_customer_id": "9b3503bd-fd04-4e39-9271-b2bc26fa5c96",
  "customer": {
    "name": "Miss Vincent Marquardt",
    "email": "test@gmail.com",
    "phone_number": "666",
    "address": {
      "street": null,
      "building": null,
      "street_2": null,
      "city": null,
      "state": null,
      "postal_code": null,
      "country": null
    }
  },
  "customer_pickup": false,
  "currency": "sgd",
  "order_discount_name": null,
  "status": "completed",
  "remark": null,
  "created_at": "2025-04-05T19:09:54+08:00",
  "updated_at": "2025-04-05T19:09:59+08:00",
  "closed_at": "2025-04-05T19:09:59+08:00",
  "location_id": "9e42e6be-2ff8-4b37-ac14-07970d2e79ca",
  "location": {
    "id": "9e42e6be-2ff8-4b37-ac14-07970d2e79ca",
    "name": "API_Location_1740101762910",
    "address": "58 Izpod Parkway, Singapore, Singapore, sg, 079903"
  },
  "business_user_id": "1306",
  "slot_date": null,
  "slot_time": null,
  "messages": null,
  "products": [],
  "charges": [
    {
      "id": "9e9a3451-a3e5-4fc5-9dfc-bc75e67c8808",
      "business_id": "98567029-f559-49f9-916b-042a4255b32a",
      "channel": "point_of_sale",
      "customer_id": "9b3503bd-fd04-4e39-9271-b2bc26fa5c96",
      "status": "succeeded",
      "customer": {
        "name": "Miss Vincent Marquardt",
        "email": "test@gmail.com",
        "phone_number": "666",
        "address": {
          "street": null,
          "city": null,
          "state": null,
          "postal_code": null,
          "country": null
        }
      },
      "currency": "sgd",
      "amount": 913.84,
      "refunded_amount": 0,
      "refunded_at": null,
      "fixed_fee": 0,
      "discount_fee": 0,
      "discount_fee_rate": 0,
      "failed_reason": null,
      "remark": null,
      "payment_intents": [],
      "payment_request_id": null,
      "all_inclusive_fee": null,
      "home_currency": null,
      "payment_provider": {
        "code": "hitpay",
        "account_id": "98567029-f559-49f9-916b-042a4255b32a",
        "charge": {
          "type": "business_charge",
          "id": "9e9a3451-a3e5-4fc5-9dfc-bc75e67c8808",
          "method": "cash",
          "transfer_type": null,
          "details": null,
          "logo": "/icons/payment-methods-2/cash.png"
        }
      },
      "created_at": "2025-04-05T19:09:59+08:00",
      "updated_at": "2025-04-05T19:09:59+08:00",
      "closed_at": "2025-04-05T19:09:59+08:00",
      "location_id": "9e42e6be-2ff8-4b37-ac14-07970d2e79ca",
      "location": null,
      "business_user_id": "1306",
      "business_user_display": null,
      "terminal_id": null,
      "relatable": null
    }
  ],
  "line_items": [
    {
      "id": "9e9a344c-7b3c-4330-8926-0f9df43c3b08",
      "name": "POS TESTING - BLue",
      "thumbnail": null,
      "item_type": "product",
      "quantity": 1,
      "related_id": "9e4b75c4-cce6-4f08-ab71-abf8907f41a4",
      "unit_price": 913.84,
      "line_item_amount": 913.84,
      "item_unit_weight": 883,
      "params": null,
      "children": []
    }
  ],
  "order_form": null,
  "order_form_response": null,
  "coupon": null,
  "pickup": null,
  "payment_status": "paid",
  "fulfilment_status": "completed",
  "fulfilment_type": "in_store",
  "line_items_total": 913.84,
  "order_discount_amount": 0,
  "line_item_discount_amount": 0,
  "line_item_tax_amount": 0,
  "additional_discount_amount": 0,
  "total_discount_amount": 0,
  "line_item_price": 913.84,
  "shipping_amount": 0,
  "total_coupon_amount": 0,
  "amount": 913.84,
  "subtotal": 913.84
}
{
  "id": "9e9be21e-07dc-4a21-aeed-4e12e148c5b2",
  "order_display_number": 2767,
  "business_id": "98567029-f559-49f9-916b-042a4255b32a",
  "channel": "store_checkout",
  "version": "2.0",
  "customer_id": "9bc3f764-767f-4894-ba96-ae2d72605f68",
  "business_customer_id": "9bc3f764-767f-4894-ba96-ae2d72605f68",
  "customer": {
    "name": "Testing",
    "email": "test@gmail.com",
    "phone_number": "+65907777777",
    "address": {
      "street": null,
      "building": null,
      "street_2": null,
      "city": null,
      "state": null,
      "postal_code": null,
      "country": null
    }
  },
  "customer_pickup": true,
  "currency": "sgd",
  "order_discount_name": null,
  "status": "completed",
  "remark": "Testing",
  "created_at": "2025-04-06T15:11:47+08:00",
  "updated_at": "2025-04-06T15:15:24+08:00",
  "closed_at": "2025-04-06T15:15:24+08:00",
  "location_id": "9e42e6be-2ff8-4b37-ac14-07970d2e79ca",
  "location": {
    "id": "9e42e6be-2ff8-4b37-ac14-07970d2e79ca",
    "name": "API_Location_1740101762910",
    "address": "58 Izpod Parkway, Singapore, Singapore, sg, 079903"
  },
  "business_user_id": null,
  "slot_date": "2025-04-07",
  "slot_time": {
    "from": "02:00 PM",
    "to": "03:00 PM"
  },
  "messages": [
    {
      "status_changed": "completed"
    }
  ],
  "products": [],
  "charges": [
    {
      "id": "9e9be221-0535-4e09-b03f-72ce8da58d26",
      "business_id": "98567029-f559-49f9-916b-042a4255b32a",
      "channel": "payment_gateway",
      "customer_id": "9bc3f764-767f-4894-ba96-ae2d72605f68",
      "status": "succeeded",
      "customer": {
        "name": "Testing",
        "email": "test@gmail.com",
        "phone_number": "+84907777777",
        "address": {
          "street": null,
          "city": null,
          "state": null,
          "postal_code": null,
          "country": null
        }
      },
      "currency": "sgd",
      "amount": 99,
      "refunded_amount": 0,
      "refunded_at": null,
      "fixed_fee": 0.5,
      "discount_fee": 3.61,
      "discount_fee_rate": 3.65,
      "failed_reason": null,
      "remark": "Order #9e9be21e-07dc-4a21-aeed-4e12e148c5b2",
      "payment_intents": [],
      "payment_request_id": "9e9be21f-520f-4c75-a6f5-fb063fb970f8",
      "all_inclusive_fee": 4.11,
      "home_currency": "sgd",
      "payment_provider": {
        "code": "stripe_sg",
        "account_id": "acct_1MVTSCPJuNxCM62r",
        "charge": {
          "type": "charge",
          "id": "ch_3RAnOzAMHowMCIhZ1V2EbRFK",
          "method": "card",
          "transfer_type": "application_fee",
          "details": {
            "brand": "Visa",
            "last4": "4242",
            "country": "United States of America",
            "country_code": "us"
          },
          "logo": "/icons/payment-methods-2/card.svg"
        }
      },
      "created_at": "2025-04-06T15:11:49+08:00",
      "updated_at": "2025-04-06T15:14:10+08:00",
      "closed_at": "2025-04-06T15:14:06+08:00",
      "location_id": "9e42e6be-2ff8-4b37-ac14-07970d2e79ca",
      "location": null,
      "business_user_id": null,
      "business_user_display": null,
      "terminal_id": null,
      "relatable": null
    }
  ],
  "line_items": [
    {
      "id": "9e9be21e-37a2-4396-abe7-9e7852deba0c",
      "name": "Update_Product_1690452646",
      "thumbnail": null,
      "item_type": "product",
      "quantity": 1,
      "related_id": "9b004028-212c-4900-a936-5eb71f589604",
      "unit_price": 100,
      "line_item_amount": 100,
      "item_unit_weight": null,
      "params": {
        "remark": null,
        "product_add_ons": [],
        "product_add_ons_amount": 0,
        "product_add_ons_amount_stored": 0
      },
      "children": []
    },
    {
      "id": "9e9be21e-4364-4d56-aec6-552bcc6d58de",
      "name": "Pickup 17260388868999",
      "thumbnail": null,
      "item_type": "pickup_location",
      "quantity": 1,
      "related_id": "9cfb7977-d7aa-4939-ba5e-ea79314a558f",
      "unit_price": 0,
      "line_item_amount": 0,
      "item_unit_weight": null,
      "params": null,
      "children": []
    },
    {
      "id": "9e9be21e-4d2e-4d2d-aff4-5e2f94eace5a",
      "name": "Discount10$ (SGD 10.00)",
      "thumbnail": null,
      "item_type": "discount",
      "quantity": 1,
      "related_id": "98daf119-03ea-4018-890c-ba3ea05a7be2",
      "unit_price": -10,
      "line_item_amount": -10,
      "item_unit_weight": null,
      "params": null,
      "children": []
    }
  ],
  "order_form": null,
  "order_form_response": null,
  "coupon": null,
  "pickup": {
    "id": "9cfb7977-d7aa-4939-ba5e-ea79314a558f",
    "name": "Pickup 17260388868999",
    "address": "60 Aria Street, Singapore, Singapore State, sg, 14023",
    "slots": [
      {
        "day": "Tuesday",
        "times": [
          {
            "to": "03:00 PM",
            "from": "02:00 PM",
            "slots": "25"
          }
        ]
      },
      {
        "day": "Friday",
        "times": [
          {
            "to": "03:00 PM",
            "from": "02:00 PM",
            "slots": "25"
          }
        ]
      },
      {
        "day": "Sunday",
        "times": [
          {
            "to": "03:00 PM",
            "from": "02:00 PM",
            "slots": "25"
          }
        ]
      },
      {
        "day": "Thursday",
        "times": [
          {
            "to": "03:00 PM",
            "from": "02:00 PM",
            "slots": "25"
          }
        ]
      },
      {
        "day": "Wednesday",
        "times": [
          {
            "to": "03:00 PM",
            "from": "02:00 PM",
            "slots": "25"
          }
        ]
      },
      {
        "day": "Monday",
        "times": [
          {
            "to": "03:00 PM",
            "from": "02:00 PM",
            "slots": "25"
          }
        ]
      },
      {
        "day": "Saturday",
        "times": [
          {
            "to": "03:00 PM",
            "from": "02:00 PM",
            "slots": "25"
          }
        ]
      }
    ],
    "fulfilment_time_min": 1,
    "cut_off_time": "23:30:00",
    "fulfilment_time_max": 4,
    "blackout_dates": [
      {
        "to": "2024-02-10",
        "from": "2024-01-08"
      }
    ],
    "status": "active",
    "location": {
      "id": "98a525ca-777f-4fd3-b482-4ff417e05377",
      "name": "Pickup 1719132368",
      "street": "60 Aria Street",
      "postal_code": "14023",
      "city": "Singapore",
      "state": "Singapore State",
      "country": "sg",
      "created_at": "2023-03-09T08:31:50.000000Z",
      "updated_at": "2025-04-01T12:13:14.000000Z",
      "active": true,
      "business_id": "98567029-f559-49f9-916b-042a4255b32a",
      "pickups": []
    },
    "created_at": "2024-09-11T15:14:46+08:00",
    "updated_at": "2025-02-17T14:29:30+08:00"
  },
  "payment_status": "paid",
  "fulfilment_status": "completed",
  "fulfilment_type": "pickup",
  "line_items_total": 90,
  "order_discount_amount": 0,
  "line_item_discount_amount": 0,
  "line_item_tax_amount": 0,
  "additional_discount_amount": 0,
  "total_discount_amount": 10,
  "line_item_price": 100,
  "shipping_amount": 0,
  "total_coupon_amount": 0,
  "amount": 90,
  "subtotal": 90
}
{
  "id": "9e9be3fd-5652-4f2e-b19e-532c62cc18d2",
  "business_id": "98567029-f559-49f9-916b-042a4255b32a",
  "type": "invoice",
  "business_customer_id": "9b4271db-ebab-471f-b674-28cea39c5231",
  "reference": "12456678",
  "invoice_number": "INV-CJHA-20250406",
  "email": "test@gmail.com",
  "status": [
    "sent"
  ],
  "currency": "sgd",
  "amount": 100,
  "balance_amount": 100,
  "customer": {
    "id": "9b4271db-ebab-471f-b674-28cea39c5231",
    "name": "Randy Vasquez",
    "birth_date": null,
    "gender": null,
    "email": "test@gmail.com",
    "phone_number": null,
    "address": {
      "street": null,
      "building": null,
      "street_2": null,
      "city": null,
      "state": null,
      "postal_code": null,
      "country": null
    },
    "remark": null,
    "phone_number_country_code": null,
    "created_at": "2024-02-05T09:33:23+08:00",
    "updated_at": "2024-02-05T09:33:23+08:00",
    "address_line": ""
  },
  "send_email_by_default": true,
  "webhook": true,
  "channel": "dashboard",
  "tax_setting": null,
  "amount_no_tax": 100,
  "subtotal": 100,
  "products": [],
  "stackable_discounts": [],
  "invoice_type": "payment_by_fixed_amount",
  "payment_by": "amount",
  "send_email": true,
  "memo": "Invoice Description",
  "attached_file": null,
  "created_at": "2025-04-06T15:17:01+08:00",
  "updated_at": "2025-04-06T15:17:01+08:00",
  "invoice_date": "2025-04-06",
  "due_date": "2025-04-06",
  "payment_requests": [],
  "charges": [],
  "allow_partial_payments": 0,
  "invoice_link": "https://sandbox.hitpay.link/qotdii",
  "footer": "Invoice Footer",
  "payment_methods": [
    "card",
    "paynow_online",
    "paynow_transfer",
    "grabpay_direct",
    "grabpay_paylater",
    "qfpay_alipay",
    "qfpay_wechat",
    "shopback",
    "upi_qr"
  ],
  "recipients": [
    {
      "id": "9e9be3fd-6773-4846-8460-2ad41c7c242f",
      "invoice_id": "9e9be3fd-5652-4f2e-b19e-532c62cc18d2",
      "email": "test@gmail.com",
      "customer_id": "9b4271db-ebab-471f-b674-28cea39c5231",
      "created_at": "2025-04-06T07:17:01.000000Z",
      "updated_at": "2025-04-06T07:17:01.000000Z",
      "customer": {
        "id": "9b4271db-ebab-471f-b674-28cea39c5231",
        "business_id": "98567029-f559-49f9-916b-042a4255b32a",
        "name": "Randy Vasquez",
        "birth_date": null,
        "gender": null,
        "email": "test@gmail.com",
        "phone_number": null,
        "building": null,
        "street": null,
        "street_2": null,
        "city": null,
        "state": null,
        "postal_code": null,
        "country": null,
        "remark": null,
        "hotglue_customer_id": null,
        "created_at": "2024-02-05T01:33:23.000000Z",
        "updated_at": "2024-02-05T01:33:23.000000Z",
        "phone_number_country_code": null
      }
    }
  ],
  "late_fee_type": null,
  "late_fee_percentage": null,
  "late_fee_fixed_amount": null,
  "late_fee_grace_period": null,
  "void_reason": null,
  "voided_by_user_id": null,
  "voided_at": null
}
{
  "id": "9e9be3fd-5652-4f2e-b19e-532c62cc18d2",
  "business_id": "98567029-f559-49f9-916b-042a4255b32a",
  "type": "invoice",
  "business_customer_id": "9b4271db-ebab-471f-b674-28cea39c5231",
  "reference": "12456678",
  "invoice_number": "INV-CJHA-20250406",
  "email": "test@gmail.com",
  "status": [
    "paid"
  ],
  "currency": "sgd",
  "amount": 100,
  "balance_amount": 0,
  "customer": {
    "id": "9b4271db-ebab-471f-b674-28cea39c5231",
    "name": "Randy Vasquez",
    "birth_date": null,
    "gender": null,
    "email": "test@gmail.com",
    "phone_number": null,
    "address": {
      "street": null,
      "building": null,
      "street_2": null,
      "city": null,
      "state": null,
      "postal_code": null,
      "country": null
    },
    "remark": null,
    "phone_number_country_code": null,
    "created_at": "2024-02-05T09:33:23+08:00",
    "updated_at": "2024-02-05T09:33:23+08:00",
    "address_line": ""
  },
  "send_email_by_default": true,
  "webhook": true,
  "channel": "dashboard",
  "tax_setting": null,
  "amount_no_tax": 100,
  "subtotal": 100,
  "products": [],
  "stackable_discounts": [],
  "invoice_type": "payment_by_fixed_amount",
  "payment_by": "amount",
  "send_email": true,
  "memo": "Invoice Description",
  "attached_file": null,
  "created_at": "2025-04-06T15:17:01+08:00",
  "updated_at": "2025-04-06T15:17:43+08:00",
  "invoice_date": "2025-04-06",
  "due_date": "2025-04-06",
  "payment_requests": [
    {
      "id": "9e9be41b-2866-4307-8621-e35c633c431f",
      "name": null,
      "email": "test@gmail.com",
      "phone": null,
      "amount": "100.00",
      "currency": "sgd",
      "is_currency_editable": false,
      "status": "completed",
      "purpose": "12456678",
      "reference_number": "9e9be3fd-5652-4f2e-b19e-532c62cc18d2",
      "payment_methods": [
        "card",
        "paynow_online",
        "paynow_transfer",
        "grabpay_direct",
        "grabpay_paylater",
        "qfpay_alipay",
        "qfpay_wechat",
        "shopback",
        "upi_qr"
      ],
      "url": "https://securecheckout.sandbox.hit-pay.com/payment-request/@qasg1/9e9be41b-2866-4307-8621-e35c633c431f/checkout",
      "redirect_url": "https://invoice.sandbox.hit-pay.com/98567029-f559-49f9-916b-042a4255b32a/9e9be3fd-5652-4f2e-b19e-532c62cc18d2",
      "webhook": null,
      "send_sms": false,
      "send_email": true,
      "sms_status": "pending",
      "email_status": "sent",
      "allow_repeated_payments": false,
      "expiry_date": null,
      "address": null,
      "line_items": null,
      "executor_id": null,
      "created_at": "2025-04-06T15:17:21",
      "updated_at": "2025-04-06T15:17:43",
      "business_location_id": null,
      "payments": [
        {
          "id": "9e9be41c-2869-4b8c-8701-6c44af86b7d0",
          "quantity": 1,
          "status": "succeeded",
          "buyer_name": null,
          "buyer_phone": null,
          "buyer_email": "test@gmail.com",
          "currency": "sgd",
          "amount": "100.00",
          "refunded_amount": "0.00",
          "payment_type": "card",
          "fees": "4.15",
          "fees_currency": "sgd",
          "created_at": "2025-04-06T15:17:21",
          "updated_at": "2025-04-06T15:17:43"
        }
      ]
    }
  ],
  "charges": [
    {
      "id": "9e9be41c-2869-4b8c-8701-6c44af86b7d0",
      "business_id": "98567029-f559-49f9-916b-042a4255b32a",
      "channel": "payment_gateway",
      "customer_id": "9b4271db-ebab-471f-b674-28cea39c5231",
      "status": "succeeded",
      "customer": {
        "name": "Randy Vasquez",
        "email": "test@gmail.com",
        "phone_number": null,
        "address": {
          "street": null,
          "city": null,
          "state": null,
          "postal_code": null,
          "country": null
        }
      },
      "currency": "sgd",
      "amount": 100,
      "refunded_amount": 0,
      "refunded_at": null,
      "fixed_fee": 0.5,
      "discount_fee": 3.65,
      "discount_fee_rate": 3.65,
      "failed_reason": null,
      "remark": "12456678",
      "payment_intents": [],
      "payment_request_id": "9e9be41b-2866-4307-8621-e35c633c431f",
      "all_inclusive_fee": 4.15,
      "home_currency": "sgd",
      "payment_provider": {
        "code": "stripe_sg",
        "account_id": "acct_1MVTSCPJuNxCM62r",
        "charge": {
          "type": "charge",
          "id": "ch_3RAnSUAMHowMCIhZ3etft9Y2",
          "method": "card",
          "transfer_type": "application_fee",
          "details": {
            "brand": "Visa",
            "last4": "4242",
            "country": "United States of America",
            "country_code": "us"
          },
          "logo": "/icons/payment-methods-2/card.svg"
        }
      },
      "created_at": "2025-04-06T15:17:21+08:00",
      "updated_at": "2025-04-06T15:17:43+08:00",
      "closed_at": "2025-04-06T15:17:42+08:00",
      "location_id": null,
      "location": null,
      "business_user_id": null,
      "business_user_display": null,
      "terminal_id": null,
      "relatable": null
    }
  ],
  "allow_partial_payments": 0,
  "invoice_link": "https://sandbox.hitpay.link/qotdii",
  "footer": "Invoice Footer",
  "payment_methods": [
    "card",
    "paynow_online",
    "paynow_transfer",
    "grabpay_direct",
    "grabpay_paylater",
    "qfpay_alipay",
    "qfpay_wechat",
    "shopback",
    "upi_qr"
  ],
  "recipients": [
    {
      "id": "9e9be3fd-6773-4846-8460-2ad41c7c242f",
      "invoice_id": "9e9be3fd-5652-4f2e-b19e-532c62cc18d2",
      "email": "test3@gmail.com",
      "customer_id": "9b4271db-ebab-471f-b674-28cea39c5231",
      "created_at": "2025-04-06T07:17:01.000000Z",
      "updated_at": "2025-04-06T07:17:01.000000Z",
      "customer": {
        "id": "9b4271db-ebab-471f-b674-28cea39c5231",
        "business_id": "98567029-f559-49f9-916b-042a4255b32a",
        "name": "Randy Vasquez",
        "birth_date": null,
        "gender": null,
        "email": "test@gmail.com",
        "phone_number": null,
        "building": null,
        "street": null,
        "street_2": null,
        "city": null,
        "state": null,
        "postal_code": null,
        "country": null,
        "remark": null,
        "hotglue_customer_id": null,
        "created_at": "2024-02-05T01:33:23.000000Z",
        "updated_at": "2024-02-05T01:33:23.000000Z",
        "phone_number_country_code": null
      }
    }
  ],
  "late_fee_type": null,
  "late_fee_percentage": null,
  "late_fee_fixed_amount": null,
  "late_fee_grace_period": null,
  "void_reason": null,
  "voided_by_user_id": null,
  "voided_at": null
}
Event examples for payout transfer
{
  "id": "9e9be893-9fee-4916-aca0-403e8e42b99e",
  "beneficiary": {
    "id": "9e25698b-6792-4ec6-aa81-f58692674171",
    "is_external": true,
    "status": "approved",
    "country": "sg",
    "currency": "sgd",
    "wallet_provider": "hitpay",
    "wallet_capability": "beneficiary",
    "transfer_method": "local",
    "nickname": null,
    "remark": null,
    "holder_name": "HONGKONG & SHANGHAI BANKING CORPORATION (HSBC)",
    "holder_type": "company",
    "bank_branch_code": "040",
    "account_number": "000123454",
    "bank_name": "MALAYAN BANKING BERHAD",
    "bank_id": "MBBESGS2[9636]",
    "email": "test@gmail.com",
    "is_favourite": true,
    "created_at": "2025-02-06T17:46:57+08:00",
    "updated_at": "2025-03-22T22:42:17+08:00",
    "deleted_at": null
  },
  "payment_currency": "sgd",
  "payment_amount": 100,
  "source_currency": "sgd",
  "source_amount": 100,
  "exchange_rate": "1.00000",
  "fee_payer": "payer",
  "discount_fee_rate": 0,
  "fixed_fee": 0,
  "discount_fee": 0,
  "total_fee": 0,
  "fee_currency": "sgd",
  "remark": "123457788",
  "status": "scheduled",
  "attachment": null,
  "created_at": "2025-04-06T15:29:51+08:00"
}
{
}
{
  "id": "9e9be893-9fee-4916-aca0-403e8e42b99e",
  "beneficiary": {
    "id": "9e25698b-6792-4ec6-aa81-f58692674171",
    "is_external": true,
    "status": "approved",
    "country": "sg",
    "currency": "sgd",
    "wallet_provider": "hitpay",
    "wallet_capability": "beneficiary",
    "transfer_method": "local",
    "nickname": null,
    "remark": null,
    "holder_name": "HONGKONG & SHANGHAI BANKING CORPORATION (HSBC)",
    "holder_type": "company",
    "bank_branch_code": "040",
    "account_number": "000123454",
    "bank_name": "MALAYAN BANKING BERHAD",
    "bank_id": "MBBESGS2[9636]",
    "email": "test@gmail.com",
    "is_favourite": true,
    "created_at": "2025-02-06T17:46:57+08:00",
    "updated_at": "2025-03-22T22:42:17+08:00",
    "deleted_at": null
  },
  "payment_currency": "sgd",
  "payment_amount": 100,
  "source_currency": "sgd",
  "source_amount": 100,
  "exchange_rate": "1.00000",
  "fee_payer": "payer",
  "discount_fee_rate": 0,
  "fixed_fee": 0,
  "discount_fee": 0,
  "total_fee": 0,
  "fee_currency": "sgd",
  "remark": "123457788",
  "status": "scheduled",
  "attachment": null,
  "created_at": "2025-04-06T15:29:51+08:00"
}
{
  "id": "9e9be893-9fee-4916-aca0-403e8e42b99e",
  "beneficiary": {
    "id": "9e25698b-6792-4ec6-aa81-f58692674171",
    "is_external": true,
    "status": "approved",
    "country": "sg",
    "currency": "sgd",
    "wallet_provider": "hitpay",
    "wallet_capability": "beneficiary",
    "transfer_method": "local",
    "nickname": null,
    "remark": null,
    "holder_name": "HONGKONG & SHANGHAI BANKING CORPORATION (HSBC)",
    "holder_type": "company",
    "bank_branch_code": "040",
    "account_number": "000123454",
    "bank_name": "MALAYAN BANKING BERHAD",
    "bank_id": "MBBESGS2[9636]",
    "email": "test@gmail.com",
    "is_favourite": true,
    "created_at": "2025-02-06T17:46:57+08:00",
    "updated_at": "2025-03-22T22:42:17+08:00",
    "deleted_at": null
  },
  "payment_currency": "sgd",
  "payment_amount": 100,
  "source_currency": "sgd",
  "source_amount": 100,
  "exchange_rate": "1.00000",
  "fee_payer": "payer",
  "discount_fee_rate": 0,
  "fixed_fee": 0,
  "discount_fee": 0,
  "total_fee": 0,
  "fee_currency": "sgd",
  "remark": "123457788",
  "status": "processing",
  "attachment": null,
  "created_at": "2025-04-06T15:29:51+08:00"
}
{
  "id": "9e9be893-9fee-4916-aca0-403e8e42b99e",
  "beneficiary": {
    "id": "9e25698b-6792-4ec6-aa81-f58692674171",
    "is_external": true,
    "status": "approved",
    "country": "sg",
    "currency": "sgd",
    "wallet_provider": "hitpay",
    "wallet_capability": "beneficiary",
    "transfer_method": "local",
    "nickname": null,
    "remark": null,
    "holder_name": "HONGKONG & SHANGHAI BANKING CORPORATION (HSBC)",
    "holder_type": "company",
    "bank_branch_code": "040",
    "account_number": "000123454",
    "bank_name": "MALAYAN BANKING BERHAD",
    "bank_id": "MBBESGS2[9636]",
    "email": "test@gmail.com",
    "is_favourite": true,
    "created_at": "2025-02-06T17:46:57+08:00",
    "updated_at": "2025-03-22T22:42:17+08:00",
    "deleted_at": null
  },
  "payment_currency": "sgd",
  "payment_amount": 100,
  "source_currency": "sgd",
  "source_amount": 100,
  "exchange_rate": "1.00000",
  "fee_payer": "payer",
  "discount_fee_rate": 0,
  "fixed_fee": 0,
  "discount_fee": 0,
  "total_fee": 0,
  "fee_currency": "sgd",
  "remark": "123457788",
  "status": "paid",
  "attachment": null,
  "created_at": "2025-04-06T15:29:51+08:00"
}
{
  "id": "9e9be893-9fee-4916-aca0-403e8e42b99e",
  "beneficiary": {
    "id": "9e25698b-6792-4ec6-aa81-f58692674171",
    "is_external": true,
    "status": "approved",
    "country": "sg",
    "currency": "sgd",
    "wallet_provider": "hitpay",
    "wallet_capability": "beneficiary",
    "transfer_method": "local",
    "nickname": null,
    "remark": null,
    "holder_name": "HONGKONG & SHANGHAI BANKING CORPORATION (HSBC)",
    "holder_type": "company",
    "bank_branch_code": "040",
    "account_number": "000123454",
    "bank_name": "MALAYAN BANKING BERHAD",
    "bank_id": "MBBESGS2[9636]",
    "email": "test@gmail.com",
    "is_favourite": true,
    "created_at": "2025-02-06T17:46:57+08:00",
    "updated_at": "2025-03-22T22:42:17+08:00",
    "deleted_at": null
  },
  "payment_currency": "sgd",
  "payment_amount": 100,
  "source_currency": "sgd",
  "source_amount": 100,
  "exchange_rate": "1.00000",
  "fee_payer": "payer",
  "discount_fee_rate": 0,
  "fixed_fee": 0,
  "discount_fee": 0,
  "total_fee": 0,
  "fee_currency": "sgd",
  "remark": "123457788",
  "status": "failed",
  "failure_code": 100101,
  "failure_message": "Invalid account number",
  "attachment": null,
  "created_at": "2025-04-06T15:29:51+08:00"
}
{
  "id": "9e9be893-9fee-4916-aca0-403e8e42b99e",
  "beneficiary": {
    "id": "9e25698b-6792-4ec6-aa81-f58692674171",
    "is_external": true,
    "status": "approved",
    "country": "sg",
    "currency": "sgd",
    "wallet_provider": "hitpay",
    "wallet_capability": "beneficiary",
    "transfer_method": "local",
    "nickname": null,
    "remark": null,
    "holder_name": "HONGKONG & SHANGHAI BANKING CORPORATION (HSBC)",
    "holder_type": "company",
    "bank_branch_code": "040",
    "account_number": "000123454",
    "bank_name": "MALAYAN BANKING BERHAD",
    "bank_id": "MBBESGS2[9636]",
    "email": "test@gmail.com",
    "is_favourite": true,
    "created_at": "2025-02-06T17:46:57+08:00",
    "updated_at": "2025-03-22T22:42:17+08:00",
    "deleted_at": null
  },
  "payment_currency": "sgd",
  "payment_amount": 100,
  "source_currency": "sgd",
  "source_amount": 100,
  "exchange_rate": "1.00000",
  "fee_payer": "payer",
  "discount_fee_rate": 0,
  "fixed_fee": 0,
  "discount_fee": 0,
  "total_fee": 0,
  "fee_currency": "sgd",
  "remark": "123457788",
  "status": "canceled",
  "attachment": null,
  "created_at": "2025-04-06T15:29:51+08:00"
}
{
  "id": "9e9be893-9fee-4916-aca0-403e8e42b99e",
  "bank_name": "MALAYAN BANKING BERHAD",
  "bank_swift_code": "MBBESGS2XXX",
  "bank_account_number": "000123454",
  "currency": "sgd",
  "amount": 100,
  "status": "succeeded",
  "created_at": "2025-04-06T15:29:51+08:00"
}
transfer.failed event
| Code | Description |
|---|---|
| 100101 | Invalid account number |
| 100102 | Invalid bank branch code |
| 100103 | Invalid SWIFT/BIC code |
| 100104 | Invalid correspondent bank information |
| 100105 | Invalid bank information |
| 100106 | Invalid proxy details |
| 100107 | Transaction not supported |
| 100108 | Account type not supported |
| 100201 | Beneficiary name mismatch |
| 100202 | Account currency mismatch |
| 100301 | Invalid beneficiary details |
| 100302 | Invalid special character in beneficiary details |
| 100303 | Invalid beneficiary country |
| 100401 | Screening error |
| 100402 | Regulatory restriction |
| 100501 | Insufficient balance |
| 100601 | Account closed |
| 100602 | Account inactive or dormant |
| 100603 | Account under restriction |
| 100604 | Beneficiary deceased |
| 100701 | Beneficiary requested |
| 100702 | Beneficiary bank returned |
| 100801 | China local transfer beneficiary validation error |
| 100802 | China local transfer order error |
| 100803 | Beneficiary account type not supported |
| 100804 | China company registration number error |
| 100805 | China local transfer processing failure |
| 100901 | Recall requested |
| 100902 | Client requested |
| 101001 | Invalid payment purpose |
| 101002 | Wrong amount |
| 101003 | Amount exceeds limit |
| 101101 | System error |
| 101102 | Channel timeout |
| 101103 | Bank offline |
| 101201 | Other error |
| 101202 | Duplicate payment |
Event examples for payment_request
{
  "id": "9e9be893-9fee-4916-aca0-403e8e42b99e",
  "bank_name": "MALAYAN BANKING BERHAD",
  "bank_swift_code": "MBBESGS2XXX",
  "bank_account_number": "000123454",
  "currency": "sgd",
  "amount": 100,
  "status": "succeeded",
  "created_at": "2025-04-06T15:29:51+08:00"
}
{
  "id": "a03e3915-5ec0-44de-a02b-0af213b62b35",
  "name": "Isabel Witting",
  "email": "hitpaydemotest@yopmail.com",
  "phone": "+6565362368",
  "amount": "7.65",
  "currency": "SGD",
  "is_currency_editable": false,
  "status": "failed",
  "purpose": "Purpose_1747900502",
  "reference_number": "1747900502",
  "payment_methods": [
    "wifi_card_reader"
  ],
  "url": "https://securecheckout.staging.hit-pay.com/payment-request/@nit/a03e3915-5ec0-44de-a02b-0af213b62b35/checkout",
  "redirect_url": "https://google.com",
  "webhook": "https://webhook.site/dab6a317-9acb-4939-b907-4924b5e144ec",
  "send_sms": false,
  "send_email": true,
  "sms_status": "pending",
  "email_status": "pending",
  "allow_repeated_payments": false,
  "expiry_date": null,
  "address": {
    "city": "Gotham",
    "line1": "a",
    "state": "N/A",
    "country": "SG",
    "postal_code": "77777"
  },
  "line_items": null,
  "executor_id": null,
  "created_at": "2025-10-31T14:11:01",
  "updated_at": "2025-10-31T14:11:13",
  "staff_id": null,
  "business_location_id": null,
  "location": null,
  "payments": [
    {
      "id": "a03e3915-eae4-4a0f-9357-6d7869f80ea2",
      "quantity": 1,
      "status": "failed",
      "status_reason_code": "withdrawal_count_limit_exceeded",
      "status_reason": "Withdrawal or limit exceeded. Please use another card.",
      "buyer_name": "Isabel Witting",
      "buyer_phone": "+6565362368",
      "buyer_email": "hitpaydemotest@yopmail.com",
      "currency": "sgd",
      "amount": "7.65",
      "refunded_amount": "0.00",
      "payment_type": "card_present",
      "fees": "0.24",
      "fees_currency": null,
      "created_at": "2025-10-31T14:11:01",
      "updated_at": "2025-10-31T14:11:12"
    }
  ]
}
Validating Webhook
HitPay uses two different salt values depending on the integration. Use the right one for the callback you are handling.API-key salt (Developers page)
This salt belongs to your business API key and is shown on the Developers page alongside your API key. It signs older payment-request and charge callbacks, plus plugin integrations—the API-driven payment flow where anhmac value is returned with the payment status.
Used for:
- Payment Request webhook and redirect callbacks
- Recurring payment callbacks
- Order and checkout callbacks (Shop, Order webhook, Hardware order)
- Plugin HMAC validation (Shopify, Wix, Xero)
hmac field in the payload, not in a header.
Per-webhook salt (Developers → Webhooks)
Each webhook endpoint you register under Developers → Webhooks has its own salt. This is the salt for event webhooks on this page (for examplecharge.completed, order.updated).
How it works: Compute HMAC-SHA256 of the raw request body using that webhook’s salt. The signature is sent in the Hitpay-Signature header.
Find the salt on the webhook’s detail view in the dashboard after you create the webhook endpoint.
The differences
| API-key salt | Per-webhook salt | |
|---|---|---|
| Scope | One per business API key | One per webhook endpoint |
| Used for | Payment-request, charge, and plugin callbacks | Event webhooks |
| Signature in | hmac field in the payload | Hitpay-Signature header |
| What’s signed | Sorted and concatenated parameters | Raw JSON body |
Validate Hitpay-Signature
- Collect data: Read the raw JSON body and the
Hitpay-Signatureheader from the incoming request. - Prepare key: Use the salt for that webhook endpoint (from Developers → Webhooks), not the API-key salt on the main Developers page.
- Compute HMAC: Generate HMAC-SHA256 over the raw body bytes with that webhook’s salt as the key.
- Compare signatures: Compare the computed HMAC to
Hitpay-Signature. If they match, the request is authentic and unmodified.
function validateWebhook($payload, $signature, $salt) {
    $computedSignature = hash_hmac('sha256', $payload, $salt);
    return hash_equals($computedSignature, $signature);
}

// Usage
$payload = file_get_contents('php://input');
$signature = $_SERVER['HTTP_HITPAY_SIGNATURE'];
$salt = 'your_webhook_salt_from_dashboard';

if (validateWebhook($payload, $signature, $salt)) {
    $data = json_decode($payload, true);
// Process the event
} else {
http_response_code(401);
exit('Invalid signature');
}
const crypto = require('crypto');

function validateWebhook(payload, signature, salt) {
    const computedSignature = crypto
        .createHmac('sha256', salt)
        .update(payload)
        .digest('hex');
    return crypto.timingSafeEqual(
        Buffer.from(computedSignature),
        Buffer.from(signature)
    );
}

// Usage (Express)
app.post('/webhook', express.raw({ type: 'application/json' }), (req, res) => {
    const payload = req.body;
    const signature = req.headers['hitpay-signature'];
    const salt = 'your_webhook_salt_from_dashboard';

    if (validateWebhook(payload, signature, salt)) {
        const data = JSON.parse(payload);
        // Process the event
        res.status(200).send('OK');
    } else {
        res.status(401).send('Invalid signature');
    }
});