> ## Documentation Index
> Fetch the complete documentation index at: https://docs.hitpayapp.com/llms.txt
> Use this file to discover all available pages before exploring further.
# Store Design
> Customizing the design of your online store
## Overview
Customizing your online store's design allows you to create a unique and engaging shopping experience for your customers. HitPay offers several customization options to help you tailor your store's appearance to match your brand and preferences. From adding your company logo to defining the layout and colors, these customization options empower you to make your online store truly yours.
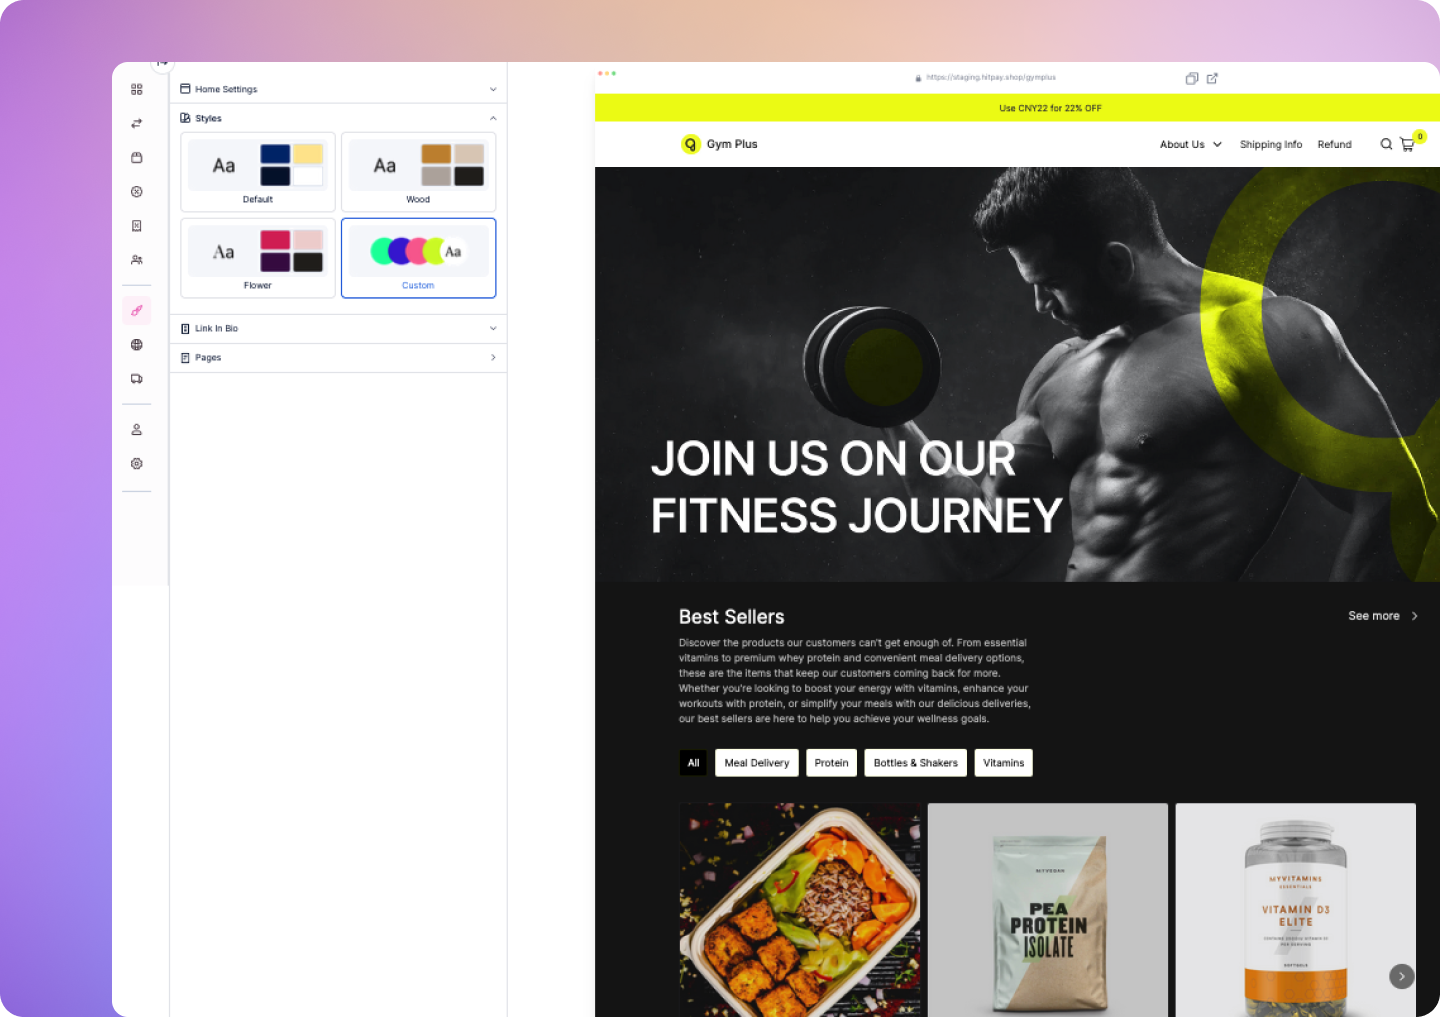 The following customization options are available to HitPay online store users:
* [Customize Store Design](#customization-options)
* [Customizable Announcement for Promotions](#customizable-announcement-for-promotions)
* [Customizing the Header and Navigation ](#customizing-the-header-and-navigation)
* [Adding a Store Banner](#adding-a-store-banner)
* [Adding Online Store Sections](#adding-online-store-sections)
* [Customizing Your Footer](#customizing-your-footer)
* [Customizing Font, Color and Card Appearance](#customizing-font-color-and-card-appearance)
* [Adding Pages and Sections ](#adding-pages-and-sections)
## Store Design Structure
The store design includes a unified navigation system with the following pages:
* **Homepage**
* **Pages**
* **Link in Bio**
### Global Components
The following components apply globally across all pages:
* Announcement
* Header
* Footer
## Customization Options
To further customize your Store's appearance, you can navigate to the **Store Design** page by going to **Online Store > Store Design** in your Web Dashboard.
The following customization options are accessible through the store design page:
### Customizable Announcement for Promotions
Highlight your store's special offers and promotions:
* Navigate to Homepage > Announcement
* Choose whether to make the announcement promotion closable.
* Customize the announcement content.
* Adjust the background color and text color.
### Customizing the Header and Navigation
The header and navigation menu help define your store’s branding and improve customer navigation.
* Navigate to **Homepage > Header**.
* Under **Settings**:
* Upload your logo and select its width.
* Choose how to align your navigation menu and logo.
* Click on **New Menu** to create a navigation menu.
* Add an existing page or an external link to the menu.
* Rearrange the menu items by dragging and dropping them.
* Under **Appearance**:
* Customize the background color and text color.
### Adding a Store Banner
Highlight your store’s special offers and promotions:
* Navigate to **Homepage > Banner**.
* Upload and customize your banner image.
* Choose full width, boxed, or half-width display.
* Adjust alignment and overlay text options.
### Adding Online Store Sections
Enhance your online store with customizable sections. Follow these steps to set up the **Products**, **Categories**, **Text**, **Text & Image**, **Gallery** and **Embed Code** sections:
#### Products Section
Define how your products appear on your storefront:
* Navigate to **Homepage or Pages > Sections**.
* Click on **+ New Section** and select **Products**.
* Choose which products to display:
* **All Products**
* **Featured Products**
* **Product Categories**
* **Pick Specific Products**
* Under **Settings**:
* Select the layout type (**Carousel** or **Grid**).
* Choose how many columns to display.
* Select the product image shape (**Landscape, Square, or Portrait**).
* Choose whether to limit the number of displayed products.
* Choose whether to display or hide the **Categories Filter**.
* Under **Content**:
* Add a section title and description to introduce the products.
* Under **Appearance**:
* Customize the background color and text color for consistency with your store’s theme.
#### Categories Section
Define and display product categories on your storefront:
* Navigate to **Homepage or Pages > Sections**.
* Click on **+ New Section** and select **Product Categories**.
* Choose which categories to display.
* Under **Settings**:
* Select the layout type (**Carousel** or **Grid**).
* Choose how many columns to display.
* Select the category image shape (**Landscape, Square, Portrait, or Circle**).
* Choose whether to display or hide the **View All Categories** page.
* Under **Content**:
* Add a section title and description to introduce the categories.
* Under **Appearance**:
* Customize the background color and text color for consistency with your store’s theme.
#### Text Section
Share important messages, promotions, or information with a flexible text section:
* Navigate to **Homepage or Pages > Sections**.
* Click on **+ New Section** and select **Text**.
* Choose how many columns to display your text.
* For a single column, select the text alignment: Split or Center.
* Customize the title, description, and add a Call-to-Action button for each column.
* Adjust text alignment and color options to fit your store’s aesthetic.
#### Text & Image Section
Combine text and images to create engaging and visually compelling content:
* Navigate to **Homepage or Pages > Sections**.
* Click on **+ New Section** and select **Text & Image**.
* Choose the image width for the text and image: Half Width or Full Width.
* Select the text alignment.
* Upload an image.
* Under **Content**, add a title and description. Optionally, include a Call-to-Action button linked to a page or product.
* Customize the background color and text color for alignment with your store's theme.
#### Gallery Section
Showcase your products, events, or customer reviews with the new gallery section:
* Navigate to **Homepage or Pages > Sections**.
* Click on **+ New Section** and select **Gallery**.
* Choose from three layout types: **Carousel**, **Masonry**, or **Grid**.
* Select how many columns to display the gallery on web and mobile.
* Upload your images and optionally assign captions, external links, and the option to show a lightbox when the image is clicked.
* Add a section title and description to explain the gallery's purpose.
* Customize the background color and text color to align with your store’s branding.
#### Embed Code Section
Embed custom content, such as newsletter sign-up, map, social media feed, or interactive survey into your online store using the **Embed Code** section:
* Navigate to **Homepage or Pages > Sections**.
* Click on **+ New Section** and select **Embed Code**.
* Choose the alignment for your embedded content: **Center** or **Split**.
* Customize the background color and text color to align with your store’s branding.
* Add a section title and description to provide context for the embedded content.
* Enter or paste your embed code directly into the **Code** field to display the external content on your store.
By customizing these sections, you can create a more engaging and visually appealing online store that reflects your brand’s identity and enhances the customer experience.
### Customizing Your Footer
Include a 'Contact Us' section with phone, WhatsApp, and Telegram links, as well as a 'Follow Us' section featuring email, other websites, and social network links.
* Click on Homepage > Footer Content.
* Find the 'Footer Link' section and click on it.
* Click on 'Add New Menu' and fill in your Phone number, WhatsApp number, or Telegram.
* Locate the "Social Media" section and click on it.
* Click on 'Add New Menu' to input your links to your social network profiles.
### Customizing Font, Color and Card Appearance
Enhance your online store's user experience by customising your store appearance
* Click on Style
* Choose from predefined styles or customize your own.
* For custom style you can customize fonts, background colors, button appearance, and card appearance.
### Adding a 'Link-in-Bio'
Link-in-bio is a feature that allows you to create a single page that acts as a hub for all of your important links. Instead of having to constantly update your bio links on social media or elsewhere, you can simply direct people to your link-in-bio page. From there, they can easily access all of the resources that you want to share with them.
* Click on Link-in-Bio.
* Click on 'Icon Links > Add More' to add links you would like to highlight as icons.
* Click on 'Button Links > Add More' to add links that you wish to showcase as buttons.
### Adding Pages and Sections
Pages allow you to create structured content beyond your homepage, helping you organize information such as **About Us**, **FAQs**, or **Custom Landing Pages**. Each page can contain multiple sections, giving you flexibility in design and layout.
### Pages
Each page consists of:
* **Page Title** – The title displayed at the top of the page.
* **Banner** – A large image or visual element at the top of the page.
* **Page Content Sections** – Customizable sections that can include text, images, product listings, and other content.
#### To add a new page:
1. Click on **New Page**.
2. Provide a **title**, **URL slug**, and choose whether to add it to the navigation bar.
3. Click **Publish** to make the page live.
Once created, you can add sections to the page to customize its layout and content.
### Customising the Categories Page
You can customise the layout and content of your **All Categories Page** or individual **Category Pages** to better reflect your brand and guide customers through your product catalog.
### What You Can Customise
Each categories page can include:
* **Title** – Displayed at the top of the page.
* **Banner** – An optional image or visual to showcase your store or key collections.
* **Content Sections** – Add flexible sections such as featured collections, product carousels, images, or text.
#### To Customise a Categories Page:
1. Go to **Online Store** > **Categories**.
2. Select **All Categories** or choose a specific category.
3. Click on the category to begin customising.
4. Add, remove, or rearrange sections to fit your layout.
5. Click **Publish** to apply changes to your live store.
Changes made to a specific category page will apply to all specific category pages.
## Conclusion
Once you're satisfied with the changes you've made to your store's design, remember to click the **Update** button to apply them. You can then return to the HitPay Dashboard.
By customizing your online store's design, you create a visually appealing and branded shopping environment that resonates with your customers and enhances their shopping journey.
The following customization options are available to HitPay online store users:
* [Customize Store Design](#customization-options)
* [Customizable Announcement for Promotions](#customizable-announcement-for-promotions)
* [Customizing the Header and Navigation ](#customizing-the-header-and-navigation)
* [Adding a Store Banner](#adding-a-store-banner)
* [Adding Online Store Sections](#adding-online-store-sections)
* [Customizing Your Footer](#customizing-your-footer)
* [Customizing Font, Color and Card Appearance](#customizing-font-color-and-card-appearance)
* [Adding Pages and Sections ](#adding-pages-and-sections)
## Store Design Structure
The store design includes a unified navigation system with the following pages:
* **Homepage**
* **Pages**
* **Link in Bio**
### Global Components
The following components apply globally across all pages:
* Announcement
* Header
* Footer
## Customization Options
To further customize your Store's appearance, you can navigate to the **Store Design** page by going to **Online Store > Store Design** in your Web Dashboard.
The following customization options are accessible through the store design page:
### Customizable Announcement for Promotions
Highlight your store's special offers and promotions:
* Navigate to Homepage > Announcement
* Choose whether to make the announcement promotion closable.
* Customize the announcement content.
* Adjust the background color and text color.
### Customizing the Header and Navigation
The header and navigation menu help define your store’s branding and improve customer navigation.
* Navigate to **Homepage > Header**.
* Under **Settings**:
* Upload your logo and select its width.
* Choose how to align your navigation menu and logo.
* Click on **New Menu** to create a navigation menu.
* Add an existing page or an external link to the menu.
* Rearrange the menu items by dragging and dropping them.
* Under **Appearance**:
* Customize the background color and text color.
### Adding a Store Banner
Highlight your store’s special offers and promotions:
* Navigate to **Homepage > Banner**.
* Upload and customize your banner image.
* Choose full width, boxed, or half-width display.
* Adjust alignment and overlay text options.
### Adding Online Store Sections
Enhance your online store with customizable sections. Follow these steps to set up the **Products**, **Categories**, **Text**, **Text & Image**, **Gallery** and **Embed Code** sections:
#### Products Section
Define how your products appear on your storefront:
* Navigate to **Homepage or Pages > Sections**.
* Click on **+ New Section** and select **Products**.
* Choose which products to display:
* **All Products**
* **Featured Products**
* **Product Categories**
* **Pick Specific Products**
* Under **Settings**:
* Select the layout type (**Carousel** or **Grid**).
* Choose how many columns to display.
* Select the product image shape (**Landscape, Square, or Portrait**).
* Choose whether to limit the number of displayed products.
* Choose whether to display or hide the **Categories Filter**.
* Under **Content**:
* Add a section title and description to introduce the products.
* Under **Appearance**:
* Customize the background color and text color for consistency with your store’s theme.
#### Categories Section
Define and display product categories on your storefront:
* Navigate to **Homepage or Pages > Sections**.
* Click on **+ New Section** and select **Product Categories**.
* Choose which categories to display.
* Under **Settings**:
* Select the layout type (**Carousel** or **Grid**).
* Choose how many columns to display.
* Select the category image shape (**Landscape, Square, Portrait, or Circle**).
* Choose whether to display or hide the **View All Categories** page.
* Under **Content**:
* Add a section title and description to introduce the categories.
* Under **Appearance**:
* Customize the background color and text color for consistency with your store’s theme.
#### Text Section
Share important messages, promotions, or information with a flexible text section:
* Navigate to **Homepage or Pages > Sections**.
* Click on **+ New Section** and select **Text**.
* Choose how many columns to display your text.
* For a single column, select the text alignment: Split or Center.
* Customize the title, description, and add a Call-to-Action button for each column.
* Adjust text alignment and color options to fit your store’s aesthetic.
#### Text & Image Section
Combine text and images to create engaging and visually compelling content:
* Navigate to **Homepage or Pages > Sections**.
* Click on **+ New Section** and select **Text & Image**.
* Choose the image width for the text and image: Half Width or Full Width.
* Select the text alignment.
* Upload an image.
* Under **Content**, add a title and description. Optionally, include a Call-to-Action button linked to a page or product.
* Customize the background color and text color for alignment with your store's theme.
#### Gallery Section
Showcase your products, events, or customer reviews with the new gallery section:
* Navigate to **Homepage or Pages > Sections**.
* Click on **+ New Section** and select **Gallery**.
* Choose from three layout types: **Carousel**, **Masonry**, or **Grid**.
* Select how many columns to display the gallery on web and mobile.
* Upload your images and optionally assign captions, external links, and the option to show a lightbox when the image is clicked.
* Add a section title and description to explain the gallery's purpose.
* Customize the background color and text color to align with your store’s branding.
#### Embed Code Section
Embed custom content, such as newsletter sign-up, map, social media feed, or interactive survey into your online store using the **Embed Code** section:
* Navigate to **Homepage or Pages > Sections**.
* Click on **+ New Section** and select **Embed Code**.
* Choose the alignment for your embedded content: **Center** or **Split**.
* Customize the background color and text color to align with your store’s branding.
* Add a section title and description to provide context for the embedded content.
* Enter or paste your embed code directly into the **Code** field to display the external content on your store.
By customizing these sections, you can create a more engaging and visually appealing online store that reflects your brand’s identity and enhances the customer experience.
### Customizing Your Footer
Include a 'Contact Us' section with phone, WhatsApp, and Telegram links, as well as a 'Follow Us' section featuring email, other websites, and social network links.
* Click on Homepage > Footer Content.
* Find the 'Footer Link' section and click on it.
* Click on 'Add New Menu' and fill in your Phone number, WhatsApp number, or Telegram.
* Locate the "Social Media" section and click on it.
* Click on 'Add New Menu' to input your links to your social network profiles.
### Customizing Font, Color and Card Appearance
Enhance your online store's user experience by customising your store appearance
* Click on Style
* Choose from predefined styles or customize your own.
* For custom style you can customize fonts, background colors, button appearance, and card appearance.
### Adding a 'Link-in-Bio'
Link-in-bio is a feature that allows you to create a single page that acts as a hub for all of your important links. Instead of having to constantly update your bio links on social media or elsewhere, you can simply direct people to your link-in-bio page. From there, they can easily access all of the resources that you want to share with them.
* Click on Link-in-Bio.
* Click on 'Icon Links > Add More' to add links you would like to highlight as icons.
* Click on 'Button Links > Add More' to add links that you wish to showcase as buttons.
### Adding Pages and Sections
Pages allow you to create structured content beyond your homepage, helping you organize information such as **About Us**, **FAQs**, or **Custom Landing Pages**. Each page can contain multiple sections, giving you flexibility in design and layout.
### Pages
Each page consists of:
* **Page Title** – The title displayed at the top of the page.
* **Banner** – A large image or visual element at the top of the page.
* **Page Content Sections** – Customizable sections that can include text, images, product listings, and other content.
#### To add a new page:
1. Click on **New Page**.
2. Provide a **title**, **URL slug**, and choose whether to add it to the navigation bar.
3. Click **Publish** to make the page live.
Once created, you can add sections to the page to customize its layout and content.
### Customising the Categories Page
You can customise the layout and content of your **All Categories Page** or individual **Category Pages** to better reflect your brand and guide customers through your product catalog.
### What You Can Customise
Each categories page can include:
* **Title** – Displayed at the top of the page.
* **Banner** – An optional image or visual to showcase your store or key collections.
* **Content Sections** – Add flexible sections such as featured collections, product carousels, images, or text.
#### To Customise a Categories Page:
1. Go to **Online Store** > **Categories**.
2. Select **All Categories** or choose a specific category.
3. Click on the category to begin customising.
4. Add, remove, or rearrange sections to fit your layout.
5. Click **Publish** to apply changes to your live store.
Changes made to a specific category page will apply to all specific category pages.
## Conclusion
Once you're satisfied with the changes you've made to your store's design, remember to click the **Update** button to apply them. You can then return to the HitPay Dashboard.
By customizing your online store's design, you create a visually appealing and branded shopping environment that resonates with your customers and enhances their shopping journey.