> ## Documentation Index
> Fetch the complete documentation index at: https://docs.hitpayapp.com/llms.txt
> Use this file to discover all available pages before exploring further.
# Products & Categories
> Explore the different aspects of managing products and categories on HitPay's Point of Sale system.
## Overview
This section covers various aspects of managing products and categories on HitPay's Point of Sale platform. Whether you're adding individual products, organizing them into categories, importing products in bulk, or facilitating quick checkouts, we've got you covered with easy-to-follow instructions.
 ## Adding Products
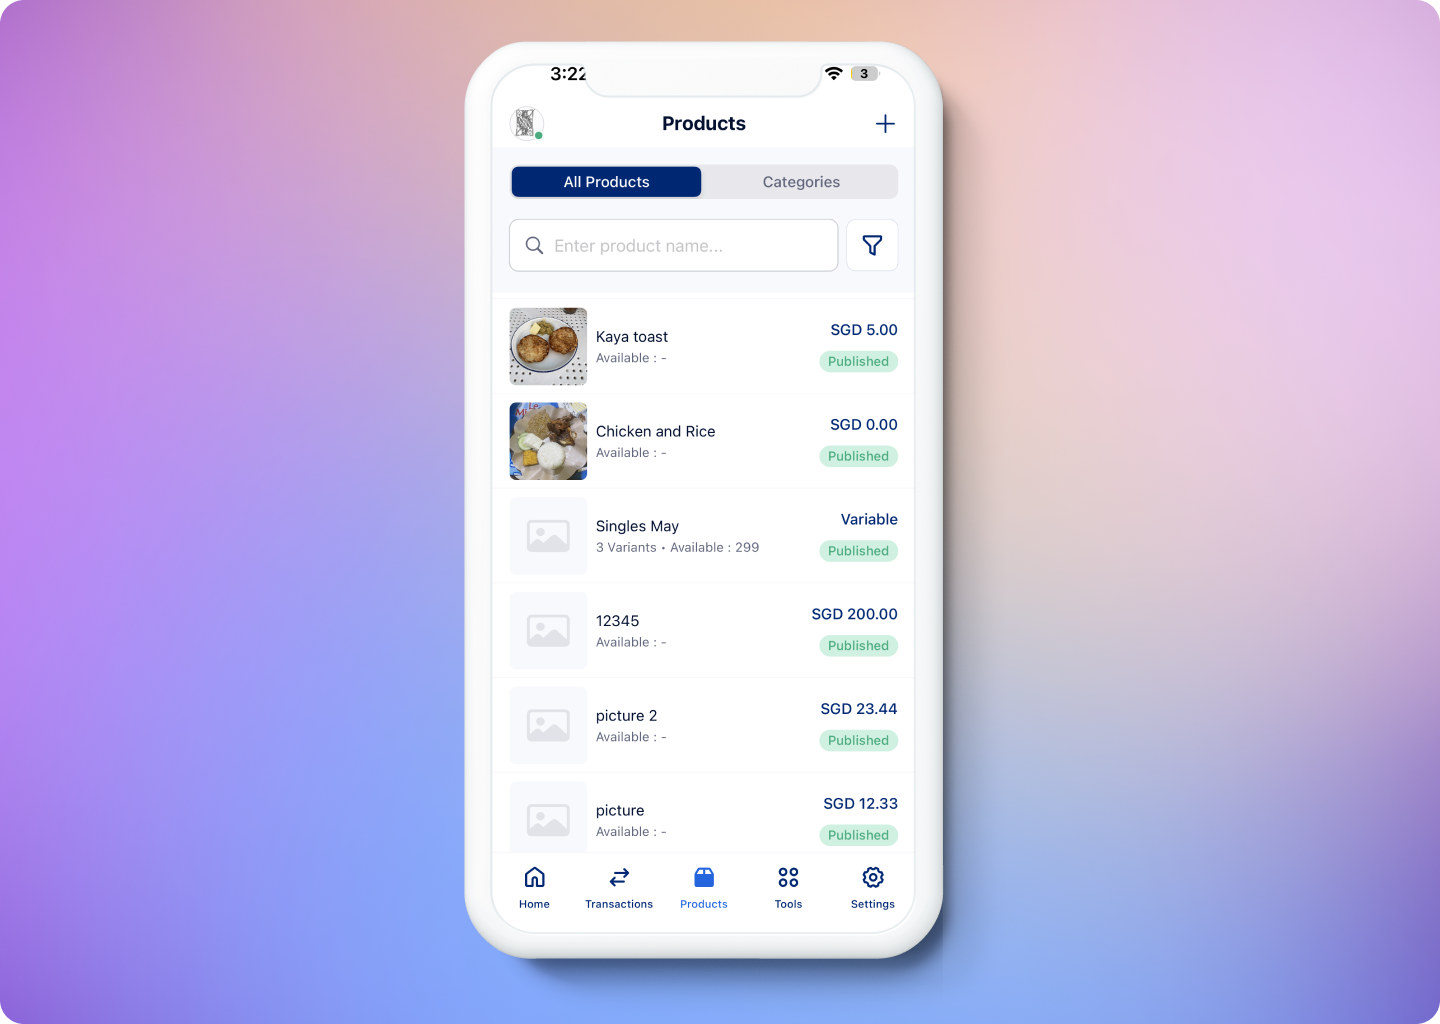
Adding products on HitPay is a straightforward process that allows you to sell your products across multiple channels such as your online store, invoices, and point of sale. You have the option to add products one by one or by using the bulk upload option to streamline the process. This way, you can have your products ready for sale in no time. This guide will walk you through the step-by-step process of adding products on Hitpay's App.
Before proceeding, confirm your HitPay App is in Point of Sale mode. You can learn more about changing modes by clicking [here](https://hitpay.mintlify.app/point_of_sale/modes#switching-between-modes)
You can add products individually on the HitPay App or choose to bulk upload by using HitPay's Web Dashboard.
### Adding Individual Products
From the HitPay App, navigate to **Products** tab, click on the **+** icon on the top right corner of the screen and select **Add a Product** to access the Add Product page.
You have the option to add:
* Product images
* Multiple product categories to enhance customer navigation
* Product variants such as size or colour
* Inventory status to add an order limit for a product and create urgency
Complete the required product fields and click the **Save** button on the top right corner of the screen when done.
## "Open Amount" Products
Besides adding products with fixed prices, you can also add "open amount" products which allows you to set custom prices at the point of checkout. This feature is ideal for businesses that offer custom goods or services, accept donations, or require flexible pricing.
In contrast to the **Quick Sale** mode, Open Amount Products provide the flexibility of setting custom amounts **while still benefiting from inventory management and product reporting**.
### Ideal Use Cases
The Open Amount Products feature is especially useful for, but not limited to :
* **Donation and charity sectors**: Collect flexible donation amounts effortlessly and create each donation purpose as a open amount products.
* **Custom goods and services**: Tailor pricing for one-of-a-kind items or services as open amount products.
* **Custom cakes**: Charge based on size, design, or specifications.
* **Repair services**: Set prices depending on repair complexity.
* **Personalized gift shops**: Provide dynamic pricing for unique, custom gifts.
### How to use "Open Amount" products
1. **Navigate to Products**: Go to the Products & Categories section within your POS system.
2. **Create a Product**:
* Add a new product.
* Under pricing, enable the **"Open Amount "** toggle.
3. **Save and Exit**: Complete the product setup.
4. **Set the Price During Checkout**:
* Select the Open Amount Product at the point of sale.
* Enter the desired price for the product.
5. **Complete the Sale**: Process the payment as usual.
## Categories
You can also create product categories in HitPay. Click [here](https://hitpay.mintlify.app/store/categories) to learn more about product categories.
To add new product categories in the HitPay App, navigate to **Products** tab, click on the **+** icon on the top right corner of the screen and select **Add a Category** to access the Add Category page. You can specify a name and description for the category and also assign products. Once done click the **Save** button on the top right corner of the screen.
**Adding Multiple Products to a Category**
This can be done by navigating to the **Products** Tab on the HitPay App and swiping left to access the "Categories Page". From the categories page, select the category you'd like to add products to and click the **Edit** button on the top right corner of the screen and then you can click on the **Assign Products** button to assign products to the category. Click **Save** when done.
## Inventory Management
To manage added products, navigate to the **Products** tab on the HitPay App and click on the product you'd like to edit. Make the needed changes and click the **Save** button on the top right corner of the screen when done.
### Managing Inventory in Multiple Locations
HitPay allows you to create multiple locations under one account. You can easily manage your products' inventory by location from the web dashboard.
**Assigning Products to Specific Locations**
* From the Web Dashboard, go to Point of Sale > Products
* Create a new product or edit an existing product
* Under the locations selector, you will see the "Availability" section. Select the locations in which the product is avaliable in
* Products will only be visible in locations which are assigned
**Assigning Inventory in Specific Locations**
* To manage inventory, ensure that the "Inventory" toggle is enabled
* Set whether you would like to track inventory in the location or not.
* If tracking is enabled, you can input the quantity of the inventory and the quantity for low stock alert.
* The quantity will be deducted automatically whenever a successful order is made.
* If you have multiple locations, you can set different quantities in each location.
## Checkout Using Products
You can can use the Product POS checkout function to charge for products that have been uploaded to HitPay.
1. From the POS Home screen, select Products tab on the top of the screen. If you have products added on to your HitPay account, you will see a list of products under the "All" section.
2. Add a Product to your Cart by clicking the **+** icon. If the product has several variants, choose a variant then click Add to Cart.
3. You can review the items you have added to the cart by clicking on the **Go to Cart** button below the screen. This will bring you to the checkout page. Here, you can add customer details, discounts, surcharges and taxes to your sale.
4. Click the Charge button and select your preferred payment method to complete the transaction.
5. After payment has been completed, you will be prompted with an option to email, print, or text SMS receipt to your customer.
## FAQs
Yes, you can import your products from shopify or woo commerce. Refer to [this](plugins/overview) section for more details
No, Your inventory is not on hold. Hitpay will only update the inventory of the order once the payment link is completed.
## Adding Products
Adding products on HitPay is a straightforward process that allows you to sell your products across multiple channels such as your online store, invoices, and point of sale. You have the option to add products one by one or by using the bulk upload option to streamline the process. This way, you can have your products ready for sale in no time. This guide will walk you through the step-by-step process of adding products on Hitpay's App.
Before proceeding, confirm your HitPay App is in Point of Sale mode. You can learn more about changing modes by clicking [here](https://hitpay.mintlify.app/point_of_sale/modes#switching-between-modes)
You can add products individually on the HitPay App or choose to bulk upload by using HitPay's Web Dashboard.
### Adding Individual Products
From the HitPay App, navigate to **Products** tab, click on the **+** icon on the top right corner of the screen and select **Add a Product** to access the Add Product page.
You have the option to add:
* Product images
* Multiple product categories to enhance customer navigation
* Product variants such as size or colour
* Inventory status to add an order limit for a product and create urgency
Complete the required product fields and click the **Save** button on the top right corner of the screen when done.
## "Open Amount" Products
Besides adding products with fixed prices, you can also add "open amount" products which allows you to set custom prices at the point of checkout. This feature is ideal for businesses that offer custom goods or services, accept donations, or require flexible pricing.
In contrast to the **Quick Sale** mode, Open Amount Products provide the flexibility of setting custom amounts **while still benefiting from inventory management and product reporting**.
### Ideal Use Cases
The Open Amount Products feature is especially useful for, but not limited to :
* **Donation and charity sectors**: Collect flexible donation amounts effortlessly and create each donation purpose as a open amount products.
* **Custom goods and services**: Tailor pricing for one-of-a-kind items or services as open amount products.
* **Custom cakes**: Charge based on size, design, or specifications.
* **Repair services**: Set prices depending on repair complexity.
* **Personalized gift shops**: Provide dynamic pricing for unique, custom gifts.
### How to use "Open Amount" products
1. **Navigate to Products**: Go to the Products & Categories section within your POS system.
2. **Create a Product**:
* Add a new product.
* Under pricing, enable the **"Open Amount "** toggle.
3. **Save and Exit**: Complete the product setup.
4. **Set the Price During Checkout**:
* Select the Open Amount Product at the point of sale.
* Enter the desired price for the product.
5. **Complete the Sale**: Process the payment as usual.
## Categories
You can also create product categories in HitPay. Click [here](https://hitpay.mintlify.app/store/categories) to learn more about product categories.
To add new product categories in the HitPay App, navigate to **Products** tab, click on the **+** icon on the top right corner of the screen and select **Add a Category** to access the Add Category page. You can specify a name and description for the category and also assign products. Once done click the **Save** button on the top right corner of the screen.
**Adding Multiple Products to a Category**
This can be done by navigating to the **Products** Tab on the HitPay App and swiping left to access the "Categories Page". From the categories page, select the category you'd like to add products to and click the **Edit** button on the top right corner of the screen and then you can click on the **Assign Products** button to assign products to the category. Click **Save** when done.
## Inventory Management
To manage added products, navigate to the **Products** tab on the HitPay App and click on the product you'd like to edit. Make the needed changes and click the **Save** button on the top right corner of the screen when done.
### Managing Inventory in Multiple Locations
HitPay allows you to create multiple locations under one account. You can easily manage your products' inventory by location from the web dashboard.
**Assigning Products to Specific Locations**
* From the Web Dashboard, go to Point of Sale > Products
* Create a new product or edit an existing product
* Under the locations selector, you will see the "Availability" section. Select the locations in which the product is avaliable in
* Products will only be visible in locations which are assigned
**Assigning Inventory in Specific Locations**
* To manage inventory, ensure that the "Inventory" toggle is enabled
* Set whether you would like to track inventory in the location or not.
* If tracking is enabled, you can input the quantity of the inventory and the quantity for low stock alert.
* The quantity will be deducted automatically whenever a successful order is made.
* If you have multiple locations, you can set different quantities in each location.
## Checkout Using Products
You can can use the Product POS checkout function to charge for products that have been uploaded to HitPay.
1. From the POS Home screen, select Products tab on the top of the screen. If you have products added on to your HitPay account, you will see a list of products under the "All" section.
2. Add a Product to your Cart by clicking the **+** icon. If the product has several variants, choose a variant then click Add to Cart.
3. You can review the items you have added to the cart by clicking on the **Go to Cart** button below the screen. This will bring you to the checkout page. Here, you can add customer details, discounts, surcharges and taxes to your sale.
4. Click the Charge button and select your preferred payment method to complete the transaction.
5. After payment has been completed, you will be prompted with an option to email, print, or text SMS receipt to your customer.
## FAQs
Yes, you can import your products from shopify or woo commerce. Refer to [this](plugins/overview) section for more details
No, Your inventory is not on hold. Hitpay will only update the inventory of the order once the payment link is completed.