> ## Documentation Index
> Fetch the complete documentation index at: https://docs.hitpayapp.com/llms.txt
> Use this file to discover all available pages before exploring further.
# WooCommerce
> Integrate HitPay payment gateway into your WooCommerce store
## Account Setup
Before you begin integrating HitPay payments into your WooCommerce store, you need to set up your HitPay account and ensure some prerequisites are met:
1. If you haven't already, create an account on [HitPay](/setup/account_creation).
2. Ensure that you have the necessary payment methods [activated](/payments/online_payments#how-to-activate-payment-methods) in your HitPay account.
3. Make sure the payment methods you want to offer are [enabled](/payments/online_payments#how-to-enable-payment-methods) in your WooCommerce sales channel.
 ## Integration Guide
You can view the checkout experience at the HitPay Test Store hosted on WooCommerce [here](https://rqz.yeu.mybluehost.me).
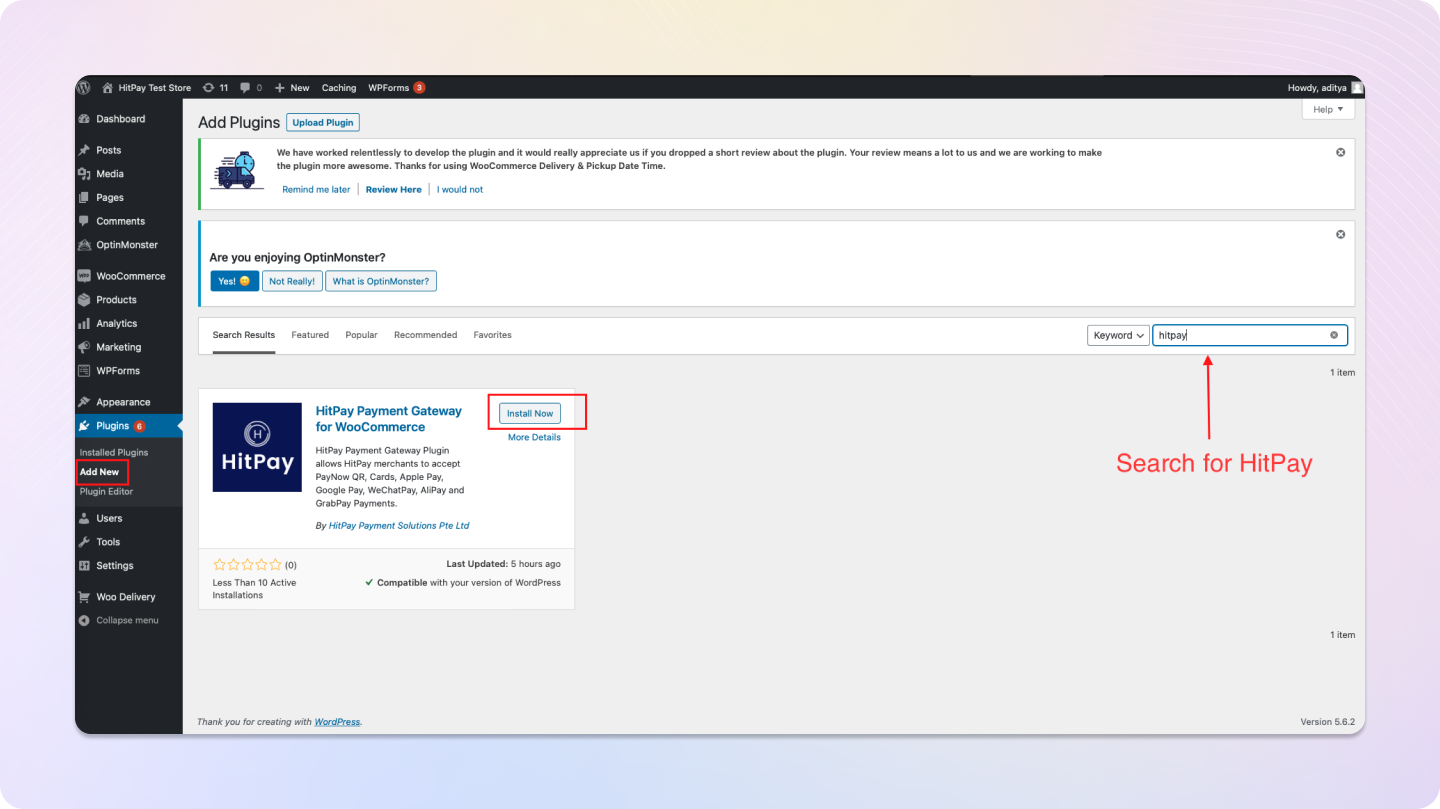
Search for **HitPay** in the plugin search field from your WordPress admin dashboard and install the plugin.
## Integration Guide
You can view the checkout experience at the HitPay Test Store hosted on WooCommerce [here](https://rqz.yeu.mybluehost.me).
Search for **HitPay** in the plugin search field from your WordPress admin dashboard and install the plugin.
 If you'd prefer to manually upload the plugin, you can download the zip from [GitHub Releases](https://github.com/hit-pay/woocommerce/releases/latest).
Once installed, click on **Activate Plugin**.
Enable auto-updates for the plugin to ensure you always have the latest version.
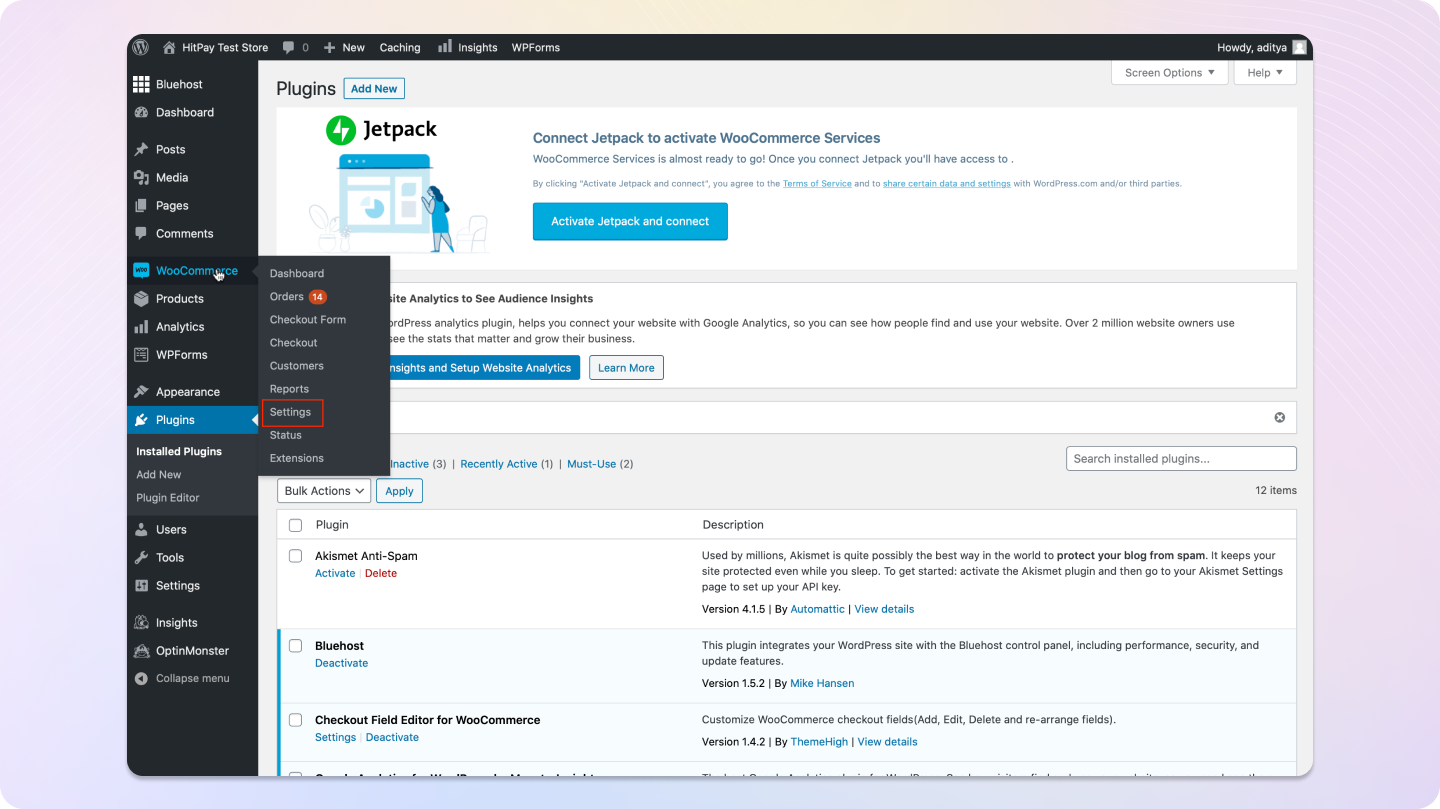
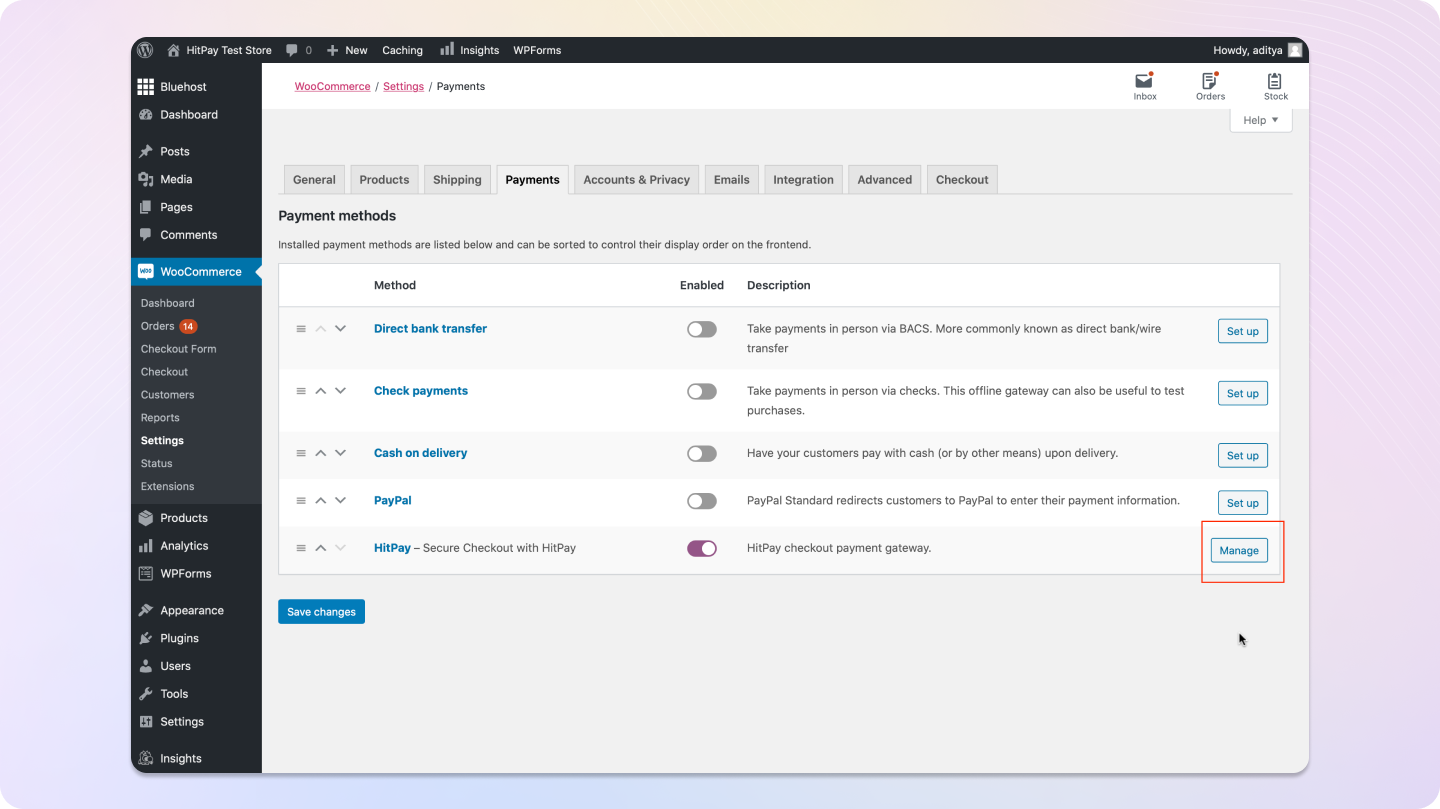
Go to **WooCommerce > Settings > Payments** and click **Manage** next to HitPay.
If you'd prefer to manually upload the plugin, you can download the zip from [GitHub Releases](https://github.com/hit-pay/woocommerce/releases/latest).
Once installed, click on **Activate Plugin**.
Enable auto-updates for the plugin to ensure you always have the latest version.
Go to **WooCommerce > Settings > Payments** and click **Manage** next to HitPay.
 You can find your API credentials in the HitPay dashboard under **Developers > API and Salt Keys**.
 Copy both the **API Key** and **Salt** and paste them into the appropriate fields in your WooCommerce plugin settings.
Enable Live Mode only if you are using production API keys and Salt.\
If you're testing, uncheck Live Mode and use the sandbox credentials from [HitPay Sandbox dashboard](https://dashboard.sandbox.hit-pay.com).
Copy both the **API Key** and **Salt** and paste them into the appropriate fields in your WooCommerce plugin settings.
Enable Live Mode only if you are using production API keys and Salt.\
If you're testing, uncheck Live Mode and use the sandbox credentials from [HitPay Sandbox dashboard](https://dashboard.sandbox.hit-pay.com).
 Click **Test Connection** to verify that your credentials are correct.\
If successful, you'll see a confirmation. If it fails, click **View Details** to understand the issue.
Click **Test Connection** to verify that your credentials are correct.\
If successful, you'll see a confirmation. If it fails, click **View Details** to understand the issue.
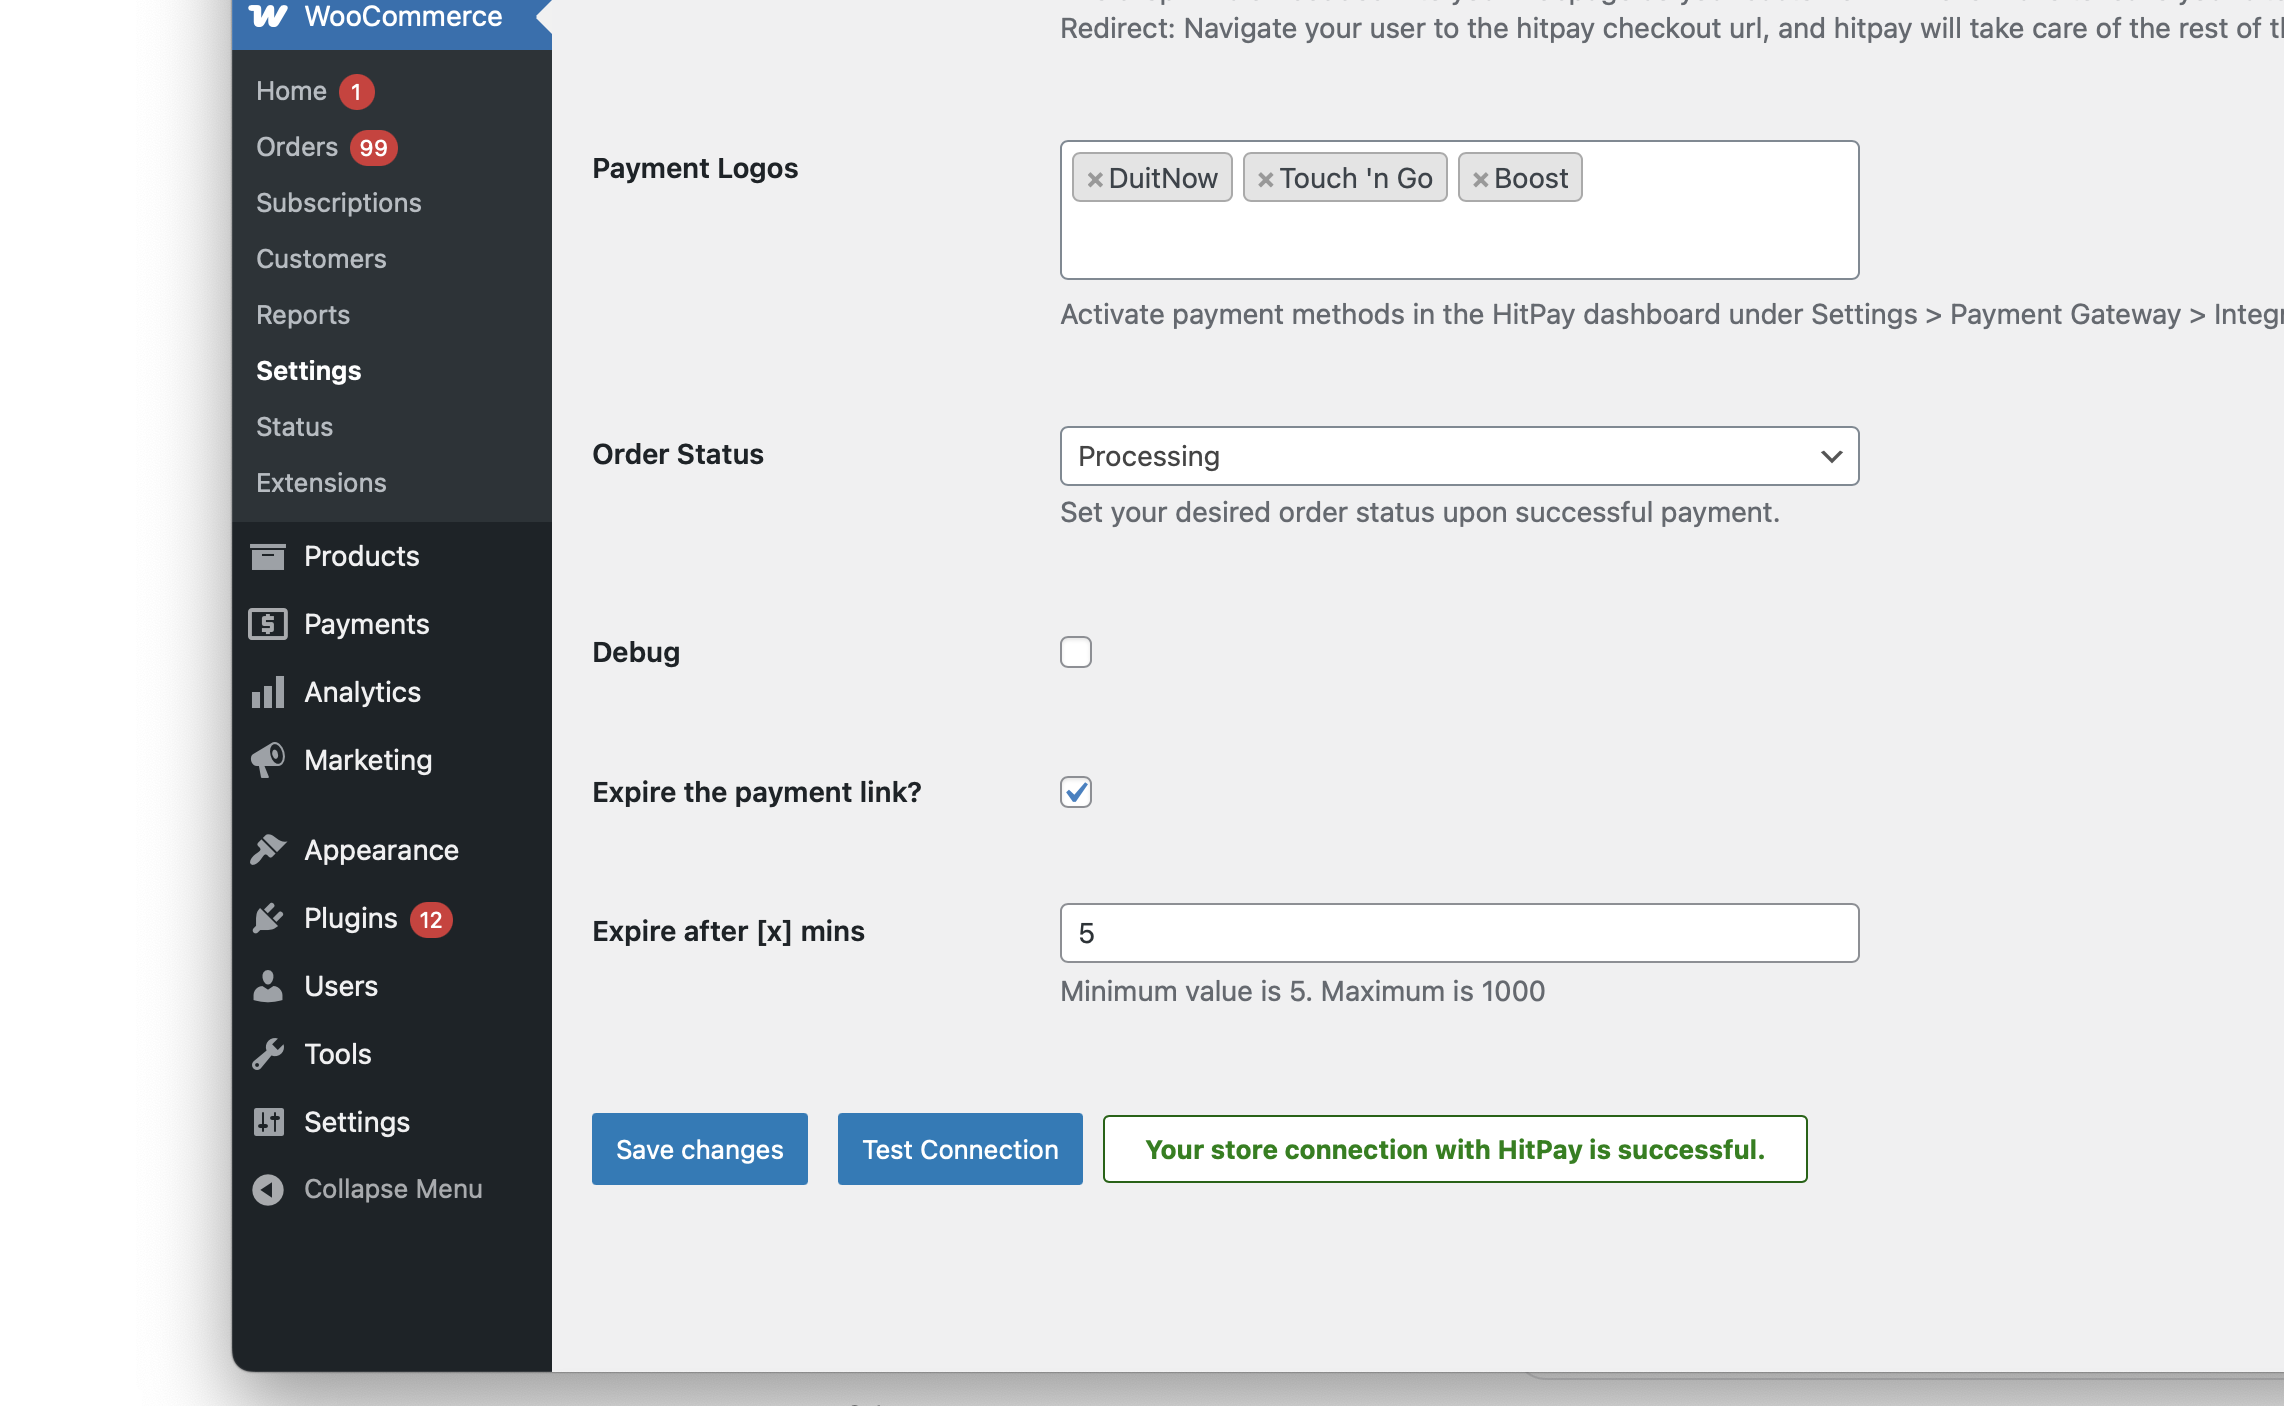 Once the test passes, click **Save Changes** to apply your configuration.
That's it! You're all set up with HitPay on WooCommerce. 🎉
### Refunds
Refunds are fully integrated into the WooCommerce dashboard, so you can directly proceed to refund an order from the WooCommerce dashboard, and it will automatically refund the payment back to the customer.
Refunds will only be successful if they meet the criteria of the payment method used. Click [Here](https://docs.hitpayapp.com/payments/refund#refund-process) for more details.
If the refund fails, please try to refund directly from the Hitpay dashboard under "Transactions > Select > Refund" to know the exact error.
If you initiate a refund from the **Hitpay dashboard**, your WooCommerce order will **not** be refunded. You need to manually update your order in WooCommerce.
**Steps to refund from WooCommerce Admin Dashboard:**
1. Log in to the Admin panel.
2. Navigate to WooCommerce by clicking on "WooCommerce" in the menu.
3. Select "Orders" from the WooCommerce menu.
4. Find the order you want to process a refund for and click on the "View" icon or the row associated with that order. This action will take you to the Admin Order Details page.
5. Scroll down on the Admin Order Details page to locate the "Refund" button. It should be displayed on the page.
6. If the order was paid using the 'HitPay Payment Gateway,' WooCommerce will, by default, display a button that says 'Refund xx via HitPay Payment Gateway' on the screen.
7. If the payment gateway accepts the refund request, the refund details will be automatically added to the order's history.
8. Please note that only one refund is allowed per transaction.
## FAQs
No, HitPay does not send an email confirmation to your customer if the payment is made through WooCommerce. This is because WooCommerce, by default, sends an email to your customer with the order details. To prevent duplicate emails, HitPay does not send an additional email to your customers. As a merchant, you will receive a payment alert email.
If you are unable to resolve the WooCommerce issues, you can request HitPay support to help with your debugging. But before that, make sure the following checks are completed:
* Ensure that your credentials are correct, both the API Key and Salt.
* Ensure that you are testing with an amount greater than \$1 (or equivalent).
* Make sure the webhook in the HitPay dashboard shows "Success."
Please provide the following details to the HitPay team:
1. Debug logs from your WooCommerce store.
2. Admin access to your WooCommerce test store (Since our team will be debugging, please avoid sending access to your live store).
3. SFTP access to your test store.
You can send the details to [support@hit-pay.com](mailto:support@hit-pay.com) (Approximate debug time would be 3 to 5 business days).
To support multiple currencies, you can use a WooCommerce plugin such as the [Currency Switcher for WooCommerce](https://wordpress.org/plugins/currency-switcher-woocommerce/). This plugin allows customers to switch between currencies on your store. Once the currency is selected, the HitPay checkout page will automatically display the relevant payment methods for that currency.
Once the test passes, click **Save Changes** to apply your configuration.
That's it! You're all set up with HitPay on WooCommerce. 🎉
### Refunds
Refunds are fully integrated into the WooCommerce dashboard, so you can directly proceed to refund an order from the WooCommerce dashboard, and it will automatically refund the payment back to the customer.
Refunds will only be successful if they meet the criteria of the payment method used. Click [Here](https://docs.hitpayapp.com/payments/refund#refund-process) for more details.
If the refund fails, please try to refund directly from the Hitpay dashboard under "Transactions > Select > Refund" to know the exact error.
If you initiate a refund from the **Hitpay dashboard**, your WooCommerce order will **not** be refunded. You need to manually update your order in WooCommerce.
**Steps to refund from WooCommerce Admin Dashboard:**
1. Log in to the Admin panel.
2. Navigate to WooCommerce by clicking on "WooCommerce" in the menu.
3. Select "Orders" from the WooCommerce menu.
4. Find the order you want to process a refund for and click on the "View" icon or the row associated with that order. This action will take you to the Admin Order Details page.
5. Scroll down on the Admin Order Details page to locate the "Refund" button. It should be displayed on the page.
6. If the order was paid using the 'HitPay Payment Gateway,' WooCommerce will, by default, display a button that says 'Refund xx via HitPay Payment Gateway' on the screen.
7. If the payment gateway accepts the refund request, the refund details will be automatically added to the order's history.
8. Please note that only one refund is allowed per transaction.
## FAQs
No, HitPay does not send an email confirmation to your customer if the payment is made through WooCommerce. This is because WooCommerce, by default, sends an email to your customer with the order details. To prevent duplicate emails, HitPay does not send an additional email to your customers. As a merchant, you will receive a payment alert email.
If you are unable to resolve the WooCommerce issues, you can request HitPay support to help with your debugging. But before that, make sure the following checks are completed:
* Ensure that your credentials are correct, both the API Key and Salt.
* Ensure that you are testing with an amount greater than \$1 (or equivalent).
* Make sure the webhook in the HitPay dashboard shows "Success."
Please provide the following details to the HitPay team:
1. Debug logs from your WooCommerce store.
2. Admin access to your WooCommerce test store (Since our team will be debugging, please avoid sending access to your live store).
3. SFTP access to your test store.
You can send the details to [support@hit-pay.com](mailto:support@hit-pay.com) (Approximate debug time would be 3 to 5 business days).
To support multiple currencies, you can use a WooCommerce plugin such as the [Currency Switcher for WooCommerce](https://wordpress.org/plugins/currency-switcher-woocommerce/). This plugin allows customers to switch between currencies on your store. Once the currency is selected, the HitPay checkout page will automatically display the relevant payment methods for that currency.