> ## Documentation Index
> Fetch the complete documentation index at: https://docs.hitpayapp.com/llms.txt
> Use this file to discover all available pages before exploring further.
# Wix
> Integrate HitPay payment gateway into your Wix store
## Account Setup
Before you begin integrating HitPay payments into your Wix store, you need to set up your HitPay account and ensure some prerequisites are met:
1. If you haven't already, create an account on [HitPay](/setup/account_creation).
2. Ensure that you have the necessary payment methods [activated](payments/payments#how-to-activate-payment-methods) in your HitPay account.
3. Make sure the payment methods you want to offer are [enabled](/payments/payments#how-to-enable-payment-methods) in your Wix sales channel.
## Integration Guide
Follow these steps to seamlessly integrate HitPay payments into your Wix store:
1. Login to your Wix dashboard
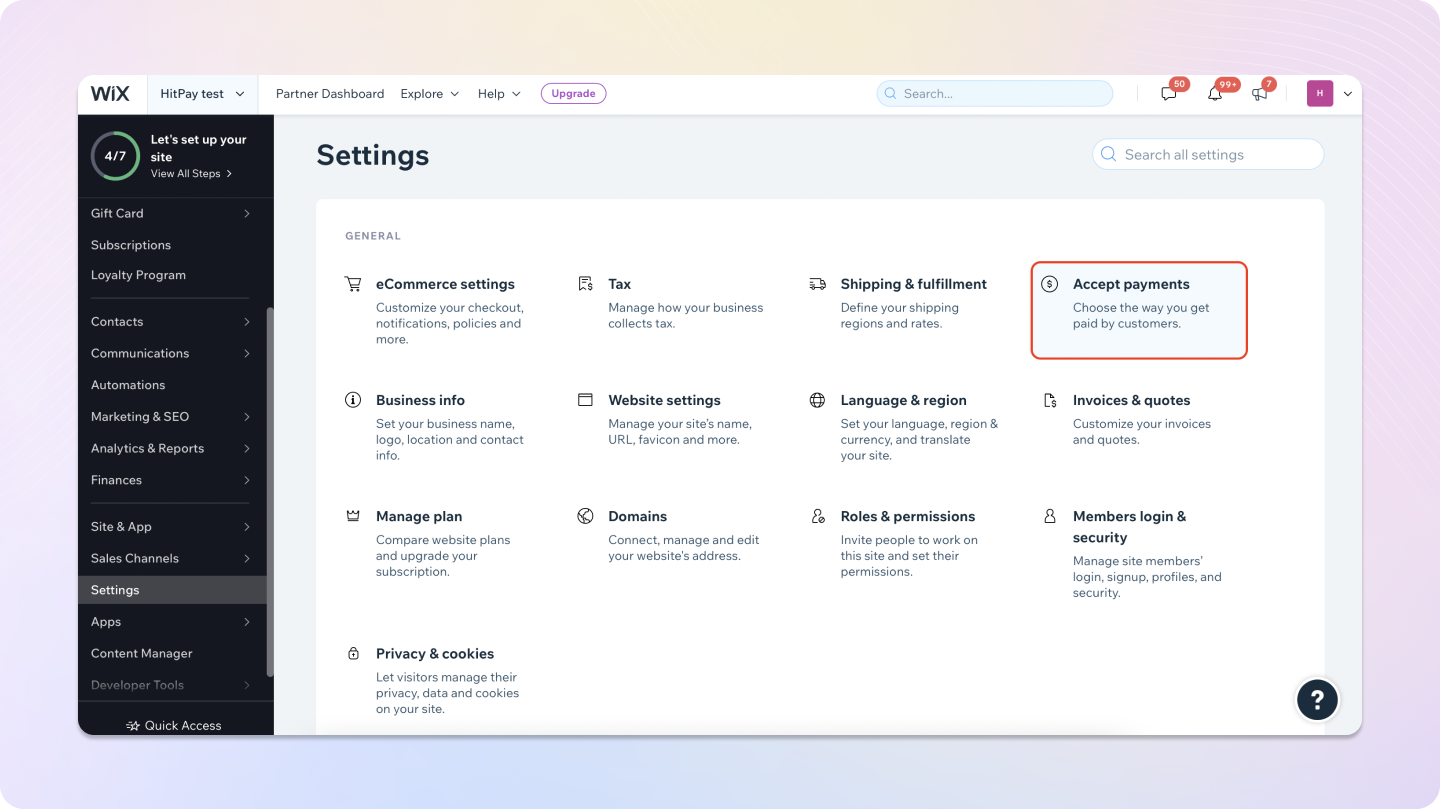
2. Navigate to **Settings > Accept Payments** in the Wix Admin Dashboard:
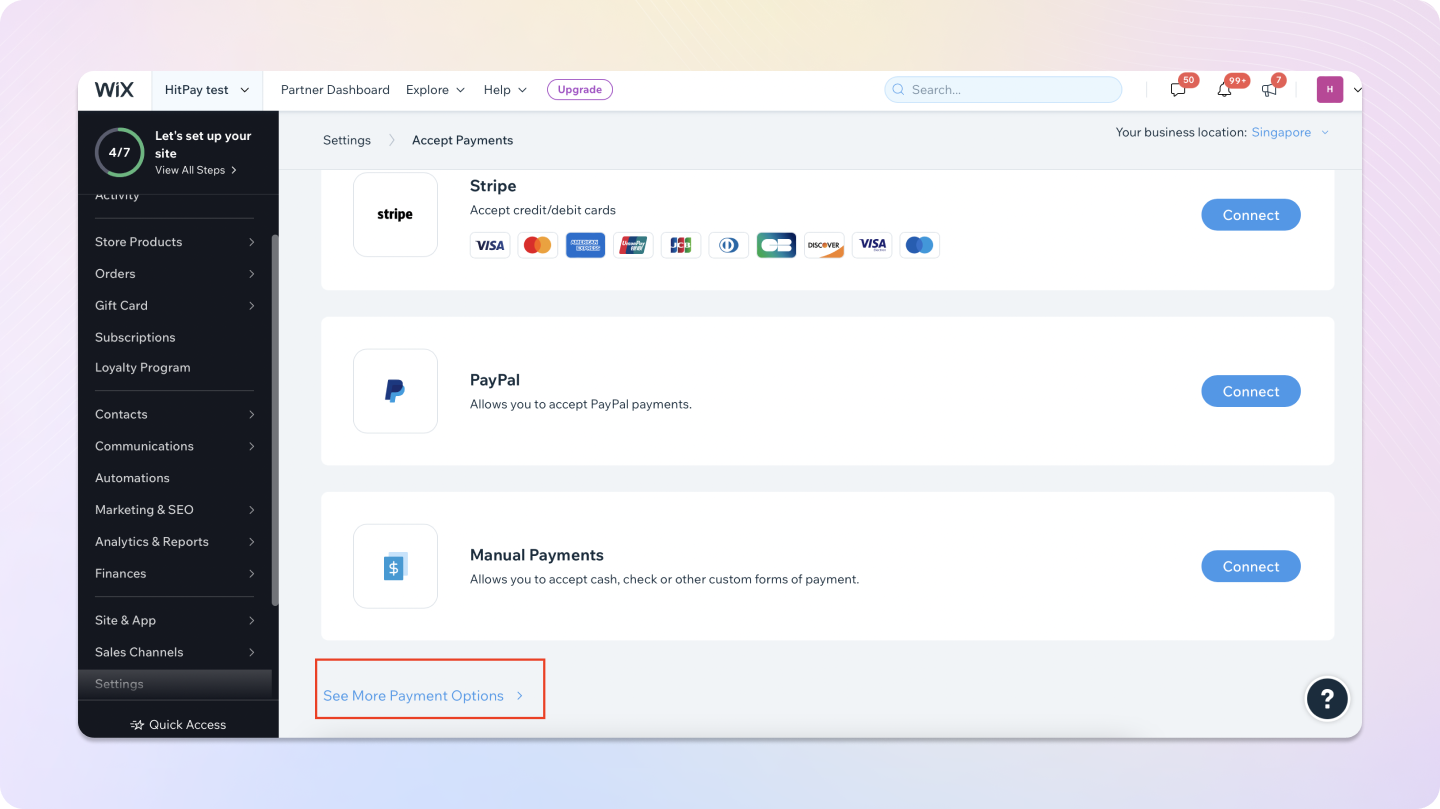
 3. Scroll down and click **See More Payment Options**
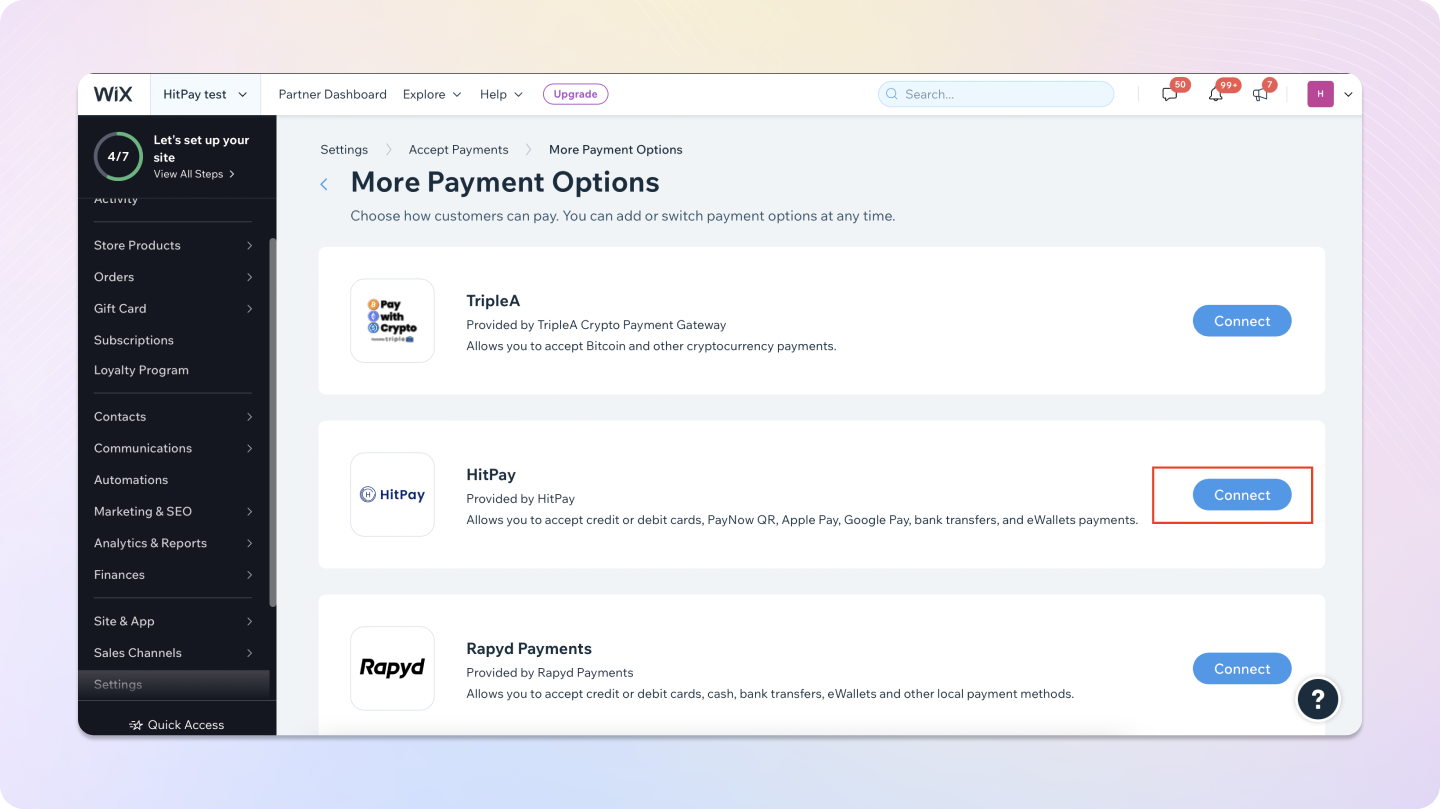
 4. Click **Connect** next to HitPay
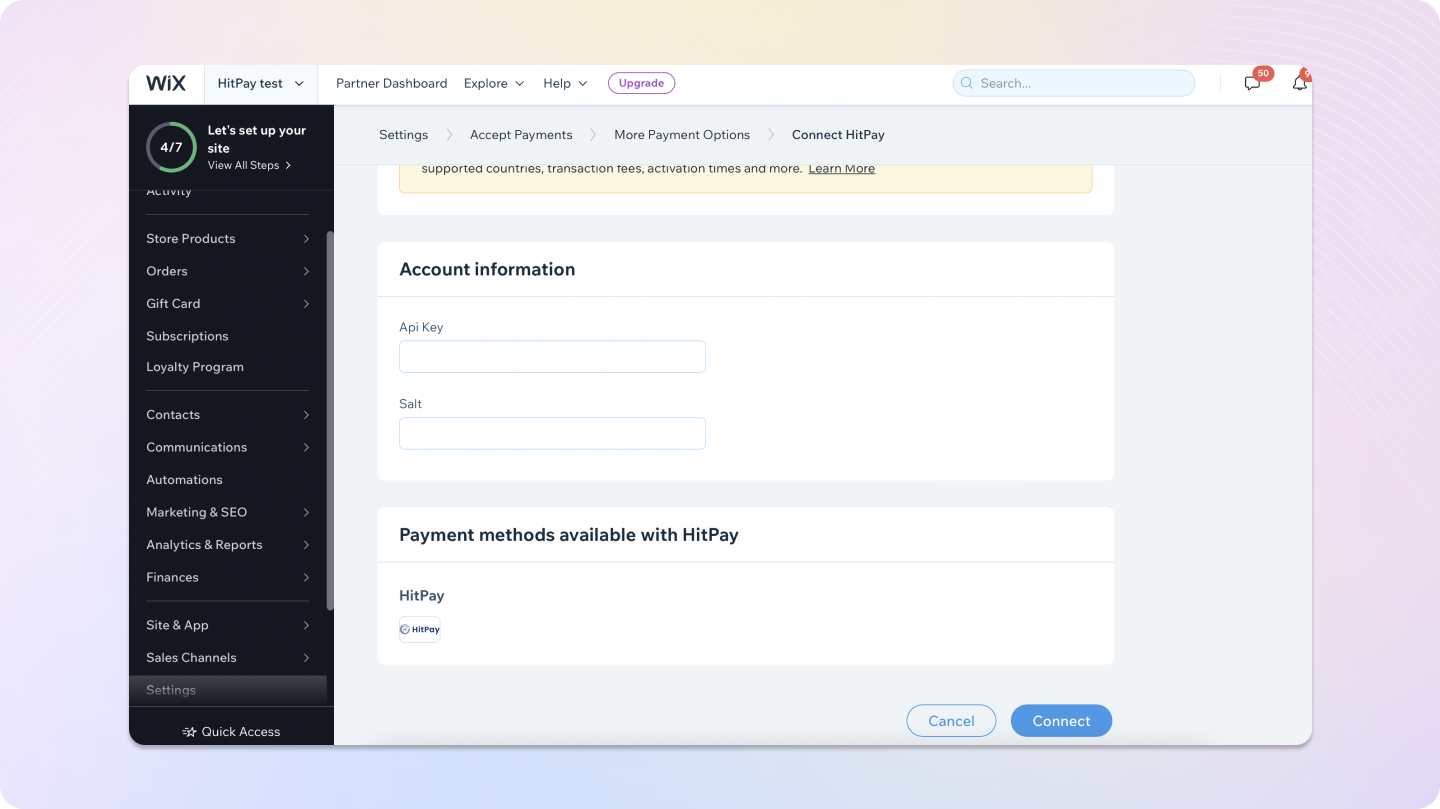
 5. Enter API Keys and Salt Values under Account Information and click on Connect. You may get API keys from **Developers > API and Salt Keys.**
 You're done! Your HitPay integration is now live.
Please note: There will be a 0.2% surcharge in the fees when payments are processed using this plugin, in addition to the existing pricing.
## Selecting Payment Methods
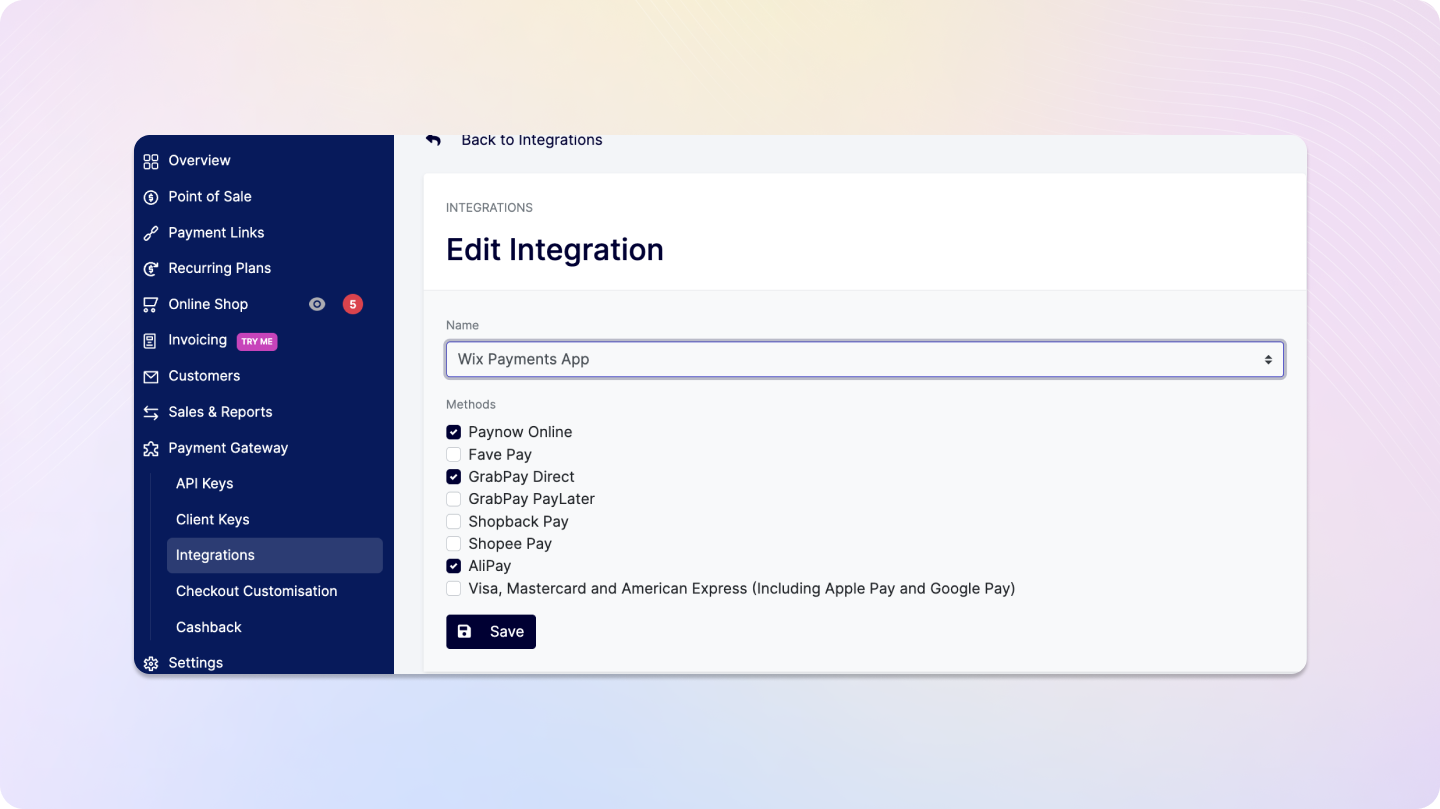
Enable/disable the payment methods for your Wix Checkout by updating your Integration Settings for Wix. Login to the hitpay dashboard and select the methods under **Integrations > Wix Payments App**
You're done! Your HitPay integration is now live.
Please note: There will be a 0.2% surcharge in the fees when payments are processed using this plugin, in addition to the existing pricing.
## Selecting Payment Methods
Enable/disable the payment methods for your Wix Checkout by updating your Integration Settings for Wix. Login to the hitpay dashboard and select the methods under **Integrations > Wix Payments App**
 ### Reconciling Orders between Wix and HitPay
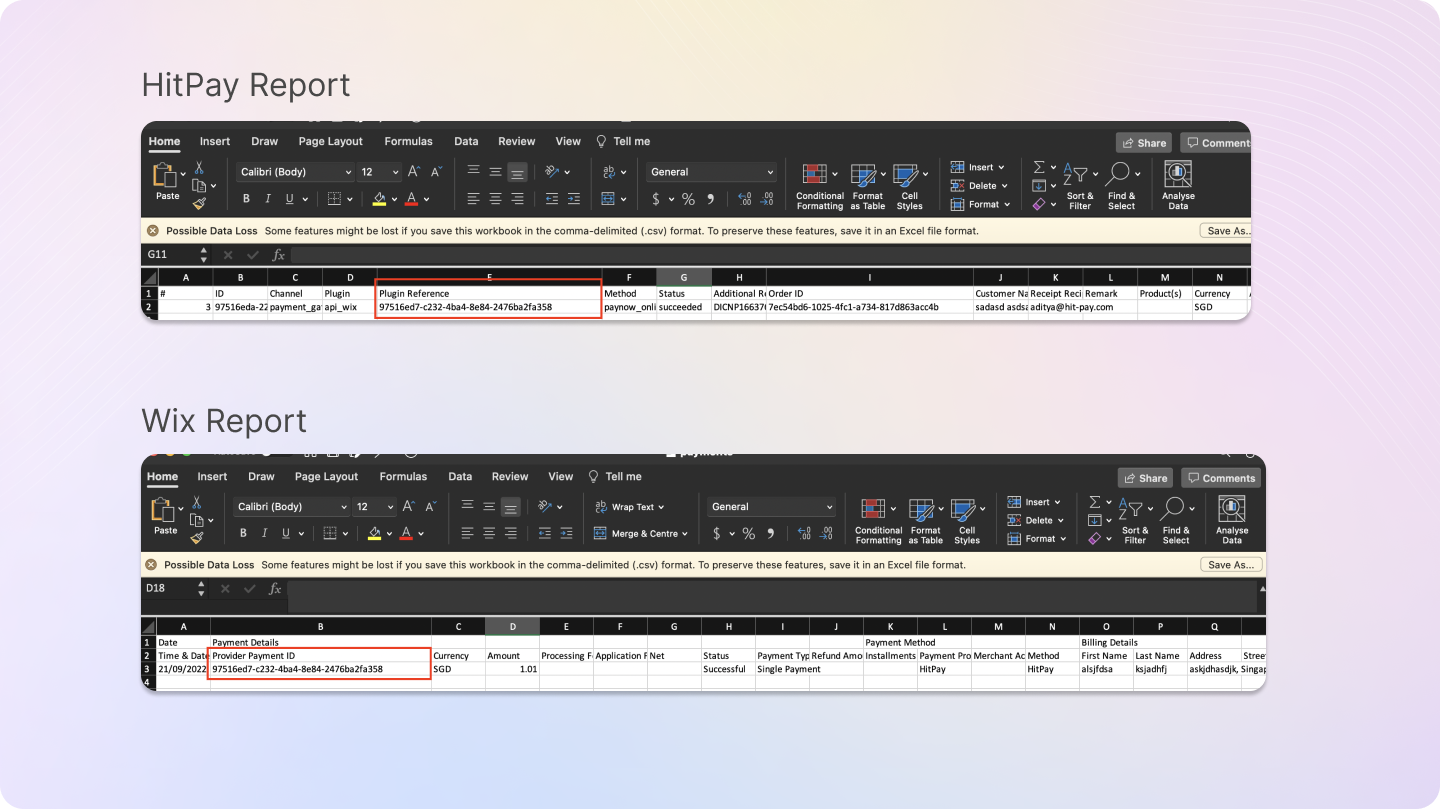
Navigate to **Finances > Payments** in the Wix Dashboard and click on the download CSV button. Upon downloading the CSV, you will find the HitPay payment reference ID under the column Provider Payment ID. You can match the above ID with Plugin Reference column which can be located from the downloaded Transactions Report by going to **Sales and Reports > Transactions** in the HitPay Dashboard.
### Reconciling Orders between Wix and HitPay
Navigate to **Finances > Payments** in the Wix Dashboard and click on the download CSV button. Upon downloading the CSV, you will find the HitPay payment reference ID under the column Provider Payment ID. You can match the above ID with Plugin Reference column which can be located from the downloaded Transactions Report by going to **Sales and Reports > Transactions** in the HitPay Dashboard.
 ### Refunds
Refunds are fully integrated into the Wix dashboard, so you can directly proceed to refund an order from the Wix dashboard, and it will automatically refund the payment back to the customer.
Refunds will only be successful if they meet the criteria of the payment method used. Click [Here](https://docs.hitpayapp.com/payments/refund#refund-process) for more details.
If the refund fails, please try to refund directly from the Hitpay dashboard under "Transactions > Select > Refund" to know the exact error.
If you initiate a refund from the **Hitpay dashboard**, your Wix order will **not** be refunded. You need to manually update your order in Wix.
**Steps to Refund an Order in Wix**
1. Log in to your Wix Admin.
2. Navigate to "Orders" in the dashboard.
3. Select the order you wish to refund.
4. Click the "Refund" button within the order details.
5. Specify refund details, including items and amount.
6. Choose the refund method (original payment or store credit).
7. Check and ensure the order status is updated to "Refunded" or similar.
8. Monitor the refund status for completion.
## FAQs
No, HitPay does not send an email confirmation to your customer if the payment is made through Wix. This is because Wix, by default, sends an email to your customer with the order details. To avoid sending duplicate emails, HitPay does not send an additional email to your customers. As a merchant, you will receive a payment alert email.
No, you cannot update the payment logo on your Wix checkout page as it's a limitation imposed by Wix.
### Refunds
Refunds are fully integrated into the Wix dashboard, so you can directly proceed to refund an order from the Wix dashboard, and it will automatically refund the payment back to the customer.
Refunds will only be successful if they meet the criteria of the payment method used. Click [Here](https://docs.hitpayapp.com/payments/refund#refund-process) for more details.
If the refund fails, please try to refund directly from the Hitpay dashboard under "Transactions > Select > Refund" to know the exact error.
If you initiate a refund from the **Hitpay dashboard**, your Wix order will **not** be refunded. You need to manually update your order in Wix.
**Steps to Refund an Order in Wix**
1. Log in to your Wix Admin.
2. Navigate to "Orders" in the dashboard.
3. Select the order you wish to refund.
4. Click the "Refund" button within the order details.
5. Specify refund details, including items and amount.
6. Choose the refund method (original payment or store credit).
7. Check and ensure the order status is updated to "Refunded" or similar.
8. Monitor the refund status for completion.
## FAQs
No, HitPay does not send an email confirmation to your customer if the payment is made through Wix. This is because Wix, by default, sends an email to your customer with the order details. To avoid sending duplicate emails, HitPay does not send an additional email to your customers. As a merchant, you will receive a payment alert email.
No, you cannot update the payment logo on your Wix checkout page as it's a limitation imposed by Wix.