> ## Documentation Index
> Fetch the complete documentation index at: https://docs.hitpayapp.com/llms.txt
> Use this file to discover all available pages before exploring further.
# Overview
> Accept in-person card payments and QR payments using HitPay terminal devices
## Overview
These APIs are designed to enable a variety of use cases where in-person payments are necessary. Here are a few examples of how this API can be used:
* Self Server Kiosk
* Point of Sale
* Vending Machines
### Terminal Devices Supported
* [WisePOS E](/pos/readers/wisepose)
* [FlexiPOS](/pos/readers/flexipos)
* [HitPay All-in-One Ingenico S1F2](/pos/readers/all-in-one-S1F2)
* [HitPay All-in-One Ingenico DX4000](/pos/readers/all-in-one-dx4000)
### How It Works
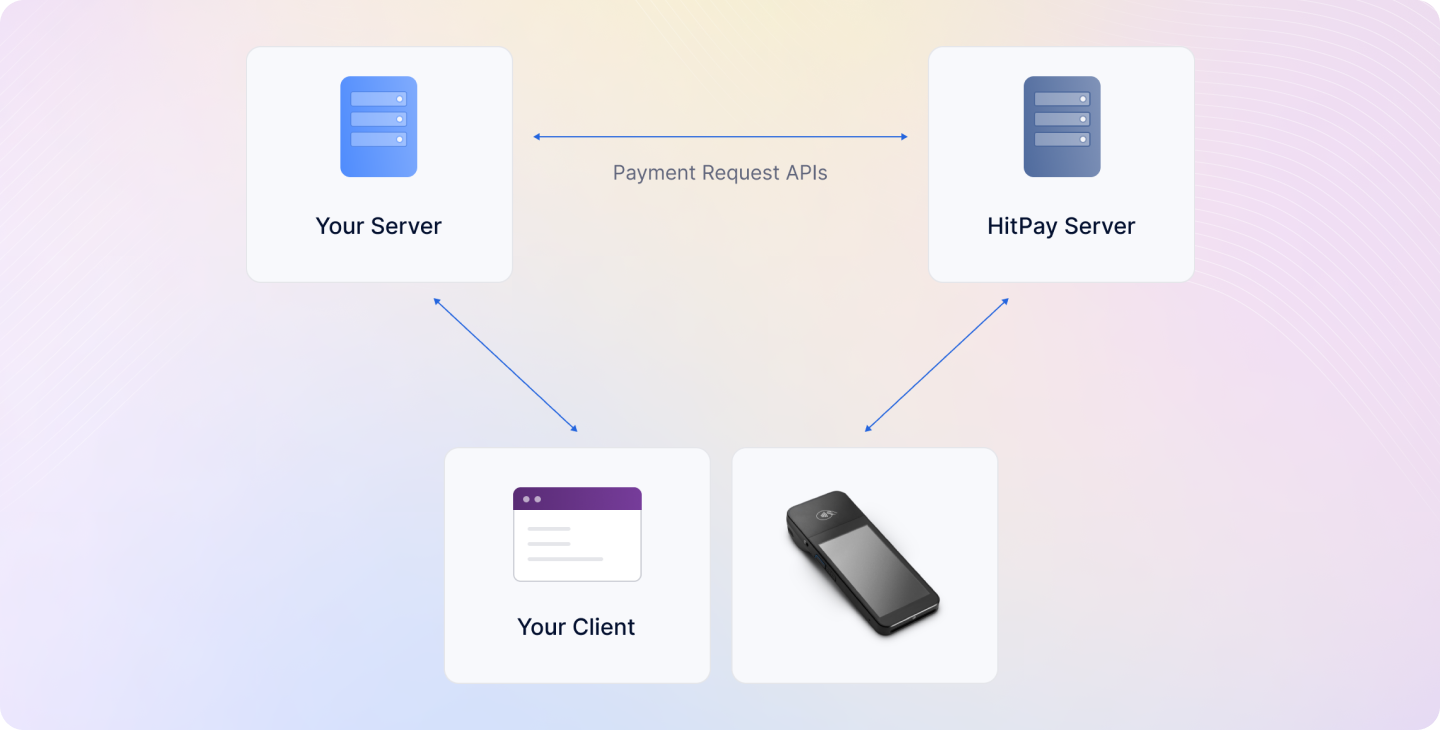 1. Your client device (e.g., POS, Kiosk) sends a request to your backend server to initiate the payment process.
2. Your backend server calls the Payment Request API with the payment method set as "wifi\_card\_reader".
3. HitPay initiates the payment process on the card reader that is already connected to the wifi.
4. Your customer presents their card to the card reader and completes the payment process.
5. HitPay sends a webhook to your backend server with the payment status information.
6. Your backend server receives the webhook and updates the order status accordingly.
## Setup Your Reader
Before you can use the In-Person Payments using Payment Requests API, you'll need to order a card reader and complete the setup process. Here's what you need to do:
1. Order a card reader: [Guide](/pos/overview#card-readers)
2. Register the reader (for WisePOS E / FlexiPOS only): [Guide](https://www.youtube.com/watch?v=PGbBwIjd9OY)
## Displaying Payments on the Terminal
**After switching your terminal to Standalone mode:**
1. On the login screen, tap the button on the top left corner.
2. Select **In-Person Payment API** from the menu.
3. The terminal will now display the In-Person Payment API screen, allowing you to accept card and QR payments.
1. Your client device (e.g., POS, Kiosk) sends a request to your backend server to initiate the payment process.
2. Your backend server calls the Payment Request API with the payment method set as "wifi\_card\_reader".
3. HitPay initiates the payment process on the card reader that is already connected to the wifi.
4. Your customer presents their card to the card reader and completes the payment process.
5. HitPay sends a webhook to your backend server with the payment status information.
6. Your backend server receives the webhook and updates the order status accordingly.
## Setup Your Reader
Before you can use the In-Person Payments using Payment Requests API, you'll need to order a card reader and complete the setup process. Here's what you need to do:
1. Order a card reader: [Guide](/pos/overview#card-readers)
2. Register the reader (for WisePOS E / FlexiPOS only): [Guide](https://www.youtube.com/watch?v=PGbBwIjd9OY)
## Displaying Payments on the Terminal
**After switching your terminal to Standalone mode:**
1. On the login screen, tap the button on the top left corner.
2. Select **In-Person Payment API** from the menu.
3. The terminal will now display the In-Person Payment API screen, allowing you to accept card and QR payments.
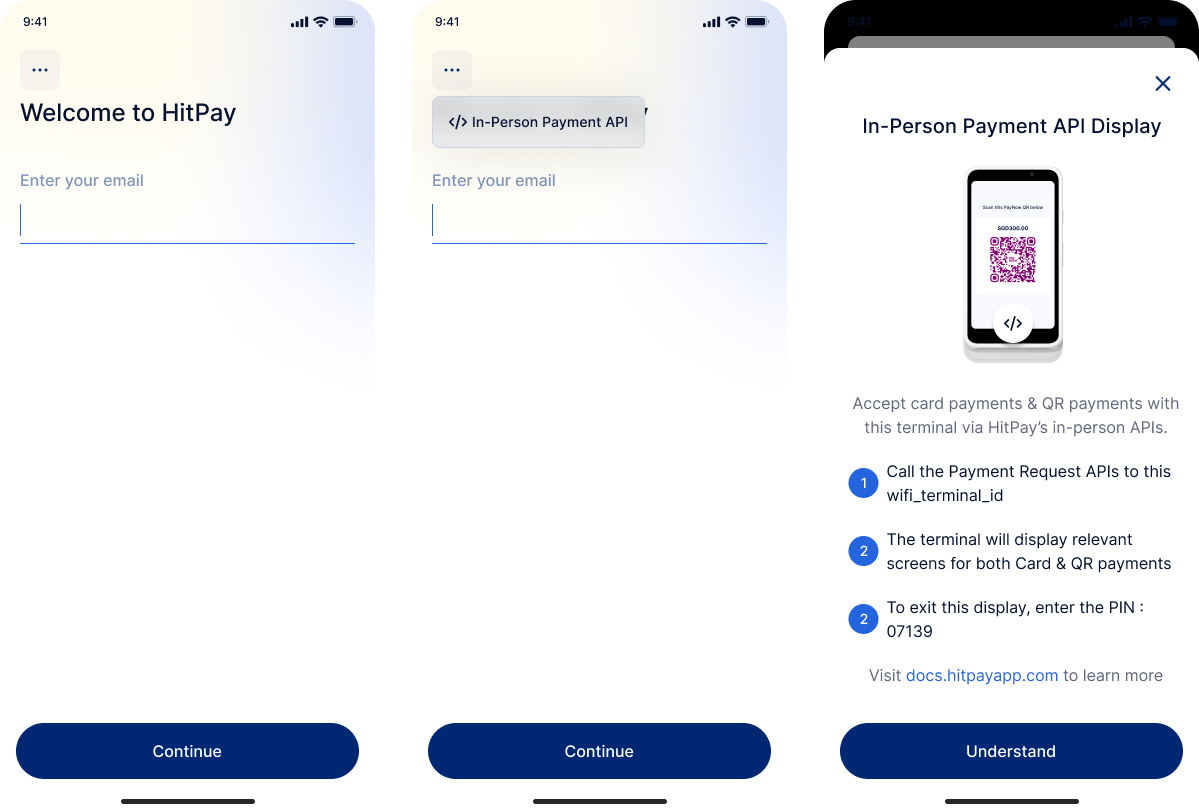 **When in this mode:**
* The display will show the HitPay logo.
* If a QR payment method is selected, the relevant QR code will be displayed for the customer to scan.
* If a card payment method is selected, the display will show instructions to tap, insert, or swipe the card.
**When in this mode:**
* The display will show the HitPay logo.
* If a QR payment method is selected, the relevant QR code will be displayed for the customer to scan.
* If a card payment method is selected, the display will show instructions to tap, insert, or swipe the card.
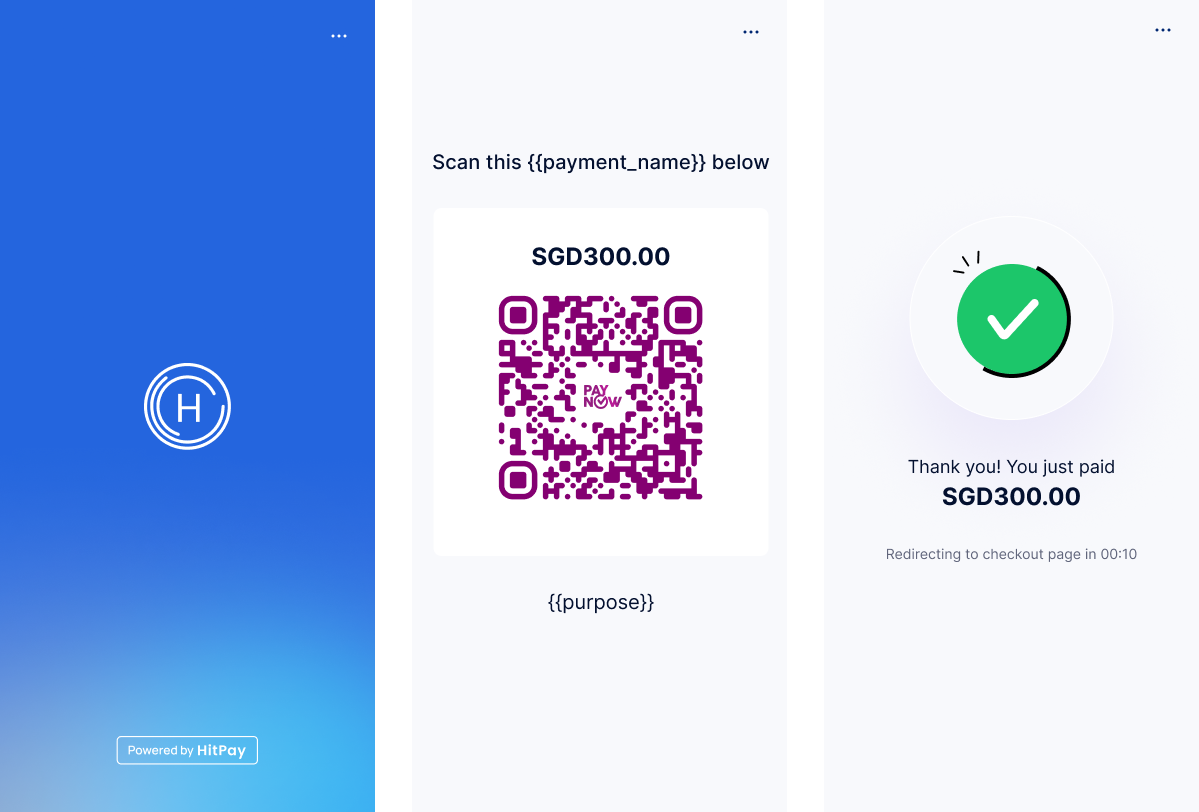 To quit the In-Person Payment API mode, please enter the PIN: `07139`.
### Ingenico DX4000
For HitPay All-in-One Ingenico DX4000 Terminal in Philippines, you have two options:
1. To accept **QR payments only**, follow instructions above. No log in is needed.
2. To accept **both QR and cards payments**, log in to your HitPay account, go to Settings > In-person Payment > key in PIN: `8888` (use the same PIN to exit mode)
## Payment Methods
The in-person payment API supports two main payment methods:
### 1. Card Payments
Accept physical card payments (credit/debit cards) using the card reader.
### 2. QR Payments
Accept QR code payments where customers scan the QR code displayed on the card reader screen.
## Create Payment Requests via APIs
Once you have all the details from the client and are ready to collect payments, use this API to create a payment request.
**Platform partners:** If you're a platform creating in-person payment requests on behalf of sub-account partners, include your `X-PLATFORM-KEY` header alongside the sub-account's `X-BUSINESS-API-KEY`. See [Platform APIs](/apis/guide/platform-apis#in-person-payments) for details.
**Endpoint**
```
POST https://api.sandbox.hit-pay.com/v1/payment-requests
```
## Initiating Card Payments
To initiate a card payment, follow these steps:
1. **Create Payment Request**: Use the Payment Request API with `payment_methods[]` set to `wifi_card_reader`
2. **Card Reader Activation**: The card reader will automatically activate and display "Ready for Payment"
3. **Customer Interaction**: Ask your customer to insert, tap, or swipe their card on the reader
4. **Payment Processing**: The card reader will process the payment and display the result
5. **Webhook Notification**: You'll receive a webhook with the payment status
### Query Parameters
Mandatory fields are amount and currency
| Parameter | Description | Example |
| ------------------- | --------------------------------------------------------------------------------------------------------------------------------------------------------------------------------------- | --------------------------------------------------------------------------------------------- |
| amount | The amount related to the payment | 2500.00 |
| payment\_methods\[] | Indicate that the request is for in-person payments using a wifi card reader | wifi\_card\_reader |
| currency | In-Person payments only support the home currency of your business | SGD |
| wifi\_terminal\_id | The reader ID can be found in your dashboard under "POS > Terminals". For Ingenico DX4000 PH terminals, use the last 8 digits of your terminal SN located at the back of your terminal. | tmr\_123123123 (WisePOSE),
To quit the In-Person Payment API mode, please enter the PIN: `07139`.
### Ingenico DX4000
For HitPay All-in-One Ingenico DX4000 Terminal in Philippines, you have two options:
1. To accept **QR payments only**, follow instructions above. No log in is needed.
2. To accept **both QR and cards payments**, log in to your HitPay account, go to Settings > In-person Payment > key in PIN: `8888` (use the same PIN to exit mode)
## Payment Methods
The in-person payment API supports two main payment methods:
### 1. Card Payments
Accept physical card payments (credit/debit cards) using the card reader.
### 2. QR Payments
Accept QR code payments where customers scan the QR code displayed on the card reader screen.
## Create Payment Requests via APIs
Once you have all the details from the client and are ready to collect payments, use this API to create a payment request.
**Platform partners:** If you're a platform creating in-person payment requests on behalf of sub-account partners, include your `X-PLATFORM-KEY` header alongside the sub-account's `X-BUSINESS-API-KEY`. See [Platform APIs](/apis/guide/platform-apis#in-person-payments) for details.
**Endpoint**
```
POST https://api.sandbox.hit-pay.com/v1/payment-requests
```
## Initiating Card Payments
To initiate a card payment, follow these steps:
1. **Create Payment Request**: Use the Payment Request API with `payment_methods[]` set to `wifi_card_reader`
2. **Card Reader Activation**: The card reader will automatically activate and display "Ready for Payment"
3. **Customer Interaction**: Ask your customer to insert, tap, or swipe their card on the reader
4. **Payment Processing**: The card reader will process the payment and display the result
5. **Webhook Notification**: You'll receive a webhook with the payment status
### Query Parameters
Mandatory fields are amount and currency
| Parameter | Description | Example |
| ------------------- | --------------------------------------------------------------------------------------------------------------------------------------------------------------------------------------- | --------------------------------------------------------------------------------------------- |
| amount | The amount related to the payment | 2500.00 |
| payment\_methods\[] | Indicate that the request is for in-person payments using a wifi card reader | wifi\_card\_reader |
| currency | In-Person payments only support the home currency of your business | SGD |
| wifi\_terminal\_id | The reader ID can be found in your dashboard under "POS > Terminals". For Ingenico DX4000 PH terminals, use the last 8 digits of your terminal SN located at the back of your terminal. | tmr\_123123123 (WisePOSE),
MD9Q2493 (Ingenico PH), S1F2-001582391283 (All-in-One S1F2) |
```php PHP theme={"system"}
$client = new http\Client;
$request = new http\Client\Request;
$request->setRequestUrl('https://api.sandbox.hit-pay.com/v1/payment-requests');
$request->setRequestMethod('POST');
$body = new http\Message\Body;
$body->append(new http\QueryString(array(
'amount' => '599',
'currency' => 'SGD',
'payment_methods[]' => 'wifi_card_reader',
'wifi_terminal_id' => 'tmr_123123123')));$request->setBody($body);
$request->setOptions(array());
$request->setHeaders(array(
'X-BUSINESS-API-KEY' => 'meowmeowmeow',
'Content-Type' => 'application/x-www-form-urlencoded',
'X-Requested-With' => 'XMLHttpRequest'
));
$client->enqueue($request)->send();
$response = $client->getResponse();
echo $response->getBody();
```
## Initiating QR Payments
In-person QR payments using payment request APIs are currently in public BETA
To initiate a QR payment, follow these steps:
1. **Create Payment Request**: Use the Payment Request API with `payment_methods[]` set to any supported QR payment method and `generate_qr` set to `true`
2. **QR Code Display**: The card reader will automatically display a QR code on its screen
3. **Customer Scanning**: Ask your customer to scan the QR code using their mobile payment app (e.g., PayNow, GrabPay, etc.)
4. **Payment Processing**: The customer completes the payment through their mobile app
5. **Webhook Notification**: You'll receive a webhook with the payment status
### Supported QR Payment Methods
For QR payments, you need to use one of the supported QR payment methods. See the complete list of [supported QR payment methods](/apis/guide/embedded-qr-code-payments#supported-methods).
QRPH payment method is currently not supported through in-person payment request APIs
### Query Parameters
| Parameter | Description | Example |
| ------------------- | --------------------------------------------------------------------------------------------------------------------------------------------------------------------------------------- | --------------------------------------------------------------------------------------------- |
| amount | The amount related to the payment | 2500.00 |
| payment\_methods\[] | One of the supported QR payment methods (e.g., paynow\_online) | paynow\_online |
| currency | In-Person payments only support the home currency of your business | SGD |
| wifi\_terminal\_id | The reader ID can be found in your dashboard under "POS > Terminals". For Ingenico DX4000 PH terminals, use the last 8 digits of your terminal SN located at the back of your terminal. | tmr\_123123123 (WisePOSE),
MD9Q2493 (Ingenico PH), S1F2-001582391283 (All-in-One S1F2) |
| generate\_qr | Set to `true` to generate QR code data | true |
```php PHP theme={"system"}
$client = new http\Client;
$request = new http\Client\Request;
$request->setRequestUrl('https://api.sandbox.hit-pay.com/v1/payment-requests');
$request->setRequestMethod('POST');
$body = new http\Message\Body;
$body->append(new http\QueryString(array(
'amount' => '599',
'currency' => 'SGD',
'payment_methods[]' => 'paynow_online',
'generate_qr' => 'true',
'wifi_terminal_id' => 'tmr_123123123')));$request->setBody($body);
$request->setOptions(array());
$request->setHeaders(array(
'X-BUSINESS-API-KEY' => 'meowmeowmeow',
'Content-Type' => 'application/x-www-form-urlencoded',
'X-Requested-With' => 'XMLHttpRequest'
));
$client->enqueue($request)->send();
$response = $client->getResponse();
echo $response->getBody();
```
### Response
The response will include a `qr_code_data` object, which contains the data to be converted into a scannable QR code (`qr_code`).
    ```json theme={"system"}
    {
      "id": "9c262fb5-f3cd-4187-8c3e-fbe20730b9c6",
      "amount": "599.00",
      "currency": "sgd",
      "status": "pending",
      "payment_methods": [
        "paynow_online"
      ],
      "wifi_terminal_id": "tmr_123123123",
      "qr_code_data": {
        "qr_code": "00020101021226550009SG.PAYNOW010120210201605883W030100414202405281445315204000053037025406599.005802SG5905Nitin6009Singapore62290125DICNP17168782314914MWULPX63043561",
        "qr_code_expiry": null
      }
    }
    ```
The card reader will automatically determine whether to show a QR code or activate card reading based on the available payment methods and customer preference.
## Handle Webhooks
After the payment is processed, HitPay sends a webhook to your server with the payment status.
### Register Your Webhook
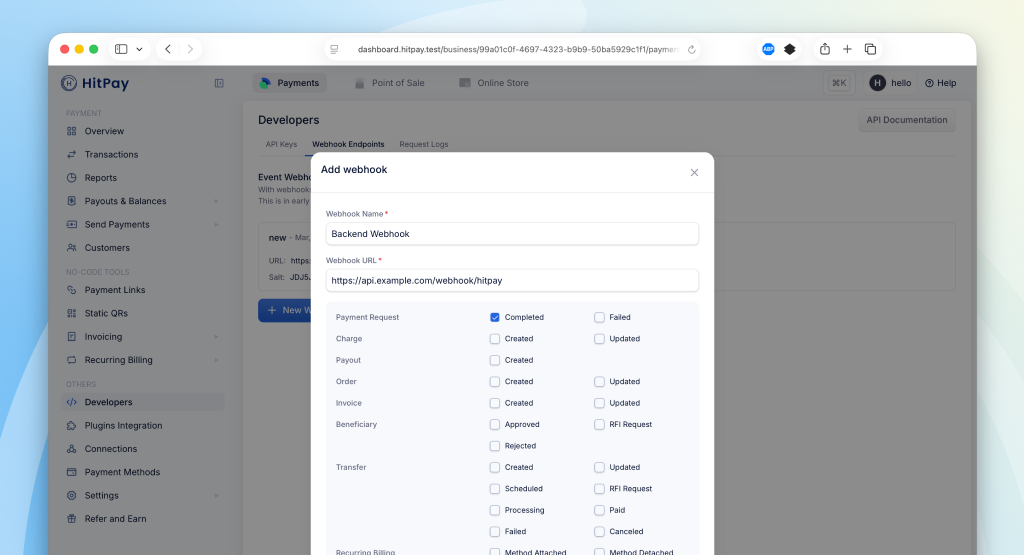
To receive payment notifications, register a webhook URL from your HitPay Dashboard:
1. Navigate to **Developers > Webhook Endpoints** in your dashboard
2. Click on **New Webhook**
3. Enter a name and your webhook URL
4. Select the `payment_request.completed` event
5. Save your webhook configuration
 ### Webhook Payload
When a payment is completed, HitPay sends a JSON payload to your registered webhook URL with the following headers:
| HTTP Header | Description |
| ------------------- | ---------------------------------------------------------------- |
| Hitpay-Signature | HMAC-SHA256 signature of the JSON payload, using your salt value |
| Hitpay-Event-Type | `completed` |
| Hitpay-Event-Object | `payment_request` |
| User-Agent | `HitPay v2.0` |
### Sample Webhook Payload
```json theme={"system"}
{
"id": "9c262fb5-f3cd-4187-8c3e-fbe20730b9c6",
"name": "John Doe",
"email": "john@example.com",
"amount": "599.00",
"currency": "SGD",
"status": "completed",
"reference_number": "ORDER123",
"payment_methods": ["wifi_card_reader"],
"created_at": "2024-05-28T14:37:11",
"updated_at": "2024-05-28T14:38:25",
"payments": [
{
"id": "9c262fb5-a1b2-4c3d-8e9f-123456789abc",
"status": "succeeded",
"currency": "sgd",
"amount": "599.00",
"refunded_amount": "0.00",
"payment_type": "card_present",
"fees": "2.50",
"created_at": "2024-05-28T14:37:11",
"updated_at": "2024-05-28T14:38:25"
}
]
}
```
### Validating the Webhook
To ensure the webhook is authentic, validate the `Hitpay-Signature` header:
```php PHP theme={"system"}
function validateWebhook($payload, $signature, $salt) {
$computedSignature = hash_hmac('sha256', $payload, $salt);
return hash_equals($computedSignature, $signature);
}
// Usage
$payload = file_get_contents('php://input');
$signature = $_SERVER['HTTP_HITPAY_SIGNATURE'];
$salt = 'your_salt_from_dashboard';
if (validateWebhook($payload, $signature, $salt)) {
$data = json_decode($payload, true);
// Process the payment confirmation
// Mark order as paid
} else {
http_response_code(401);
exit('Invalid signature');
}
```
```javascript NodeJS theme={"system"}
const crypto = require('crypto');
function validateWebhook(payload, signature, salt) {
const computedSignature = crypto
.createHmac('sha256', salt)
.update(payload)
.digest('hex');
return crypto.timingSafeEqual(
Buffer.from(computedSignature),
Buffer.from(signature)
);
}
// Usage in Express
app.post('/webhook', (req, res) => {
const payload = JSON.stringify(req.body);
const signature = req.headers['hitpay-signature'];
const salt = 'your_salt_from_dashboard';
if (validateWebhook(payload, signature, salt)) {
// Process the payment confirmation
// Mark order as paid
res.status(200).send('OK');
} else {
res.status(401).send('Invalid signature');
}
});
```
## Next Steps
Now that you understand the basics of in-person payments:
* Learn how to [handle failed payment requests](/apis/guide/in-person-payments/failed-payments)
* Get started with [testing in Sandbox](/apis/guide/in-person-payments/testing)
## FAQs
The `webhook` parameter in the payment request API is **deprecated** and will be removed in a future version.
**Why the change?**
* The new registered webhook system supports JSON payloads with richer data
* You can subscribe to multiple event types (not just payment completion)
* Centralized management from your dashboard
* Better scalability - one webhook URL handles all your payment requests
**Migration:**
1. Register your webhook URL in **Developers > Webhook Endpoints**
2. Subscribe to `payment_request.completed` event
3. Update your webhook handler to accept JSON payloads
4. Remove the `webhook` parameter from your API calls
No, these APIs only work with Wi-Fi readers.
No, you cannot connect a Bluetooth printer to the Wi-Fi terminal.
The card reader automatically detects the payment method. When you create a payment request, the reader will display a QR code first. If the customer prefers to pay with a card, they can simply insert or tap their card on the reader.
The supported QR payment methods depend on your business location and the payment networks available in your region. Common methods include PayNow (Singapore), Ingenicos (PHP), PromptPay (Thailand), and other local QR payment schemes. See the complete list of [supported QR payment methods](/apis/guide/embedded-qr-code-payments#supported-methods).
QRPH payment method is currently not supported through in-person payment request APIs
Yes, you can test in Sandbox! However, the APIs do not support a virtual simulator. To test successfully:
* **For Card Payments**: You'll need a physical test card. Contact HitPay support to obtain test cards for your region.
* **For QR Payments**: You can test with QR code payments using your mobile payment app, as these don't require physical cards.
All testing must be done with real terminals connected to the Sandbox environment. See the [Testing in Sandbox](/apis/guide/in-person-payments/testing) page for detailed instructions.
### Webhook Payload
When a payment is completed, HitPay sends a JSON payload to your registered webhook URL with the following headers:
| HTTP Header | Description |
| ------------------- | ---------------------------------------------------------------- |
| Hitpay-Signature | HMAC-SHA256 signature of the JSON payload, using your salt value |
| Hitpay-Event-Type | `completed` |
| Hitpay-Event-Object | `payment_request` |
| User-Agent | `HitPay v2.0` |
### Sample Webhook Payload
```json theme={"system"}
{
"id": "9c262fb5-f3cd-4187-8c3e-fbe20730b9c6",
"name": "John Doe",
"email": "john@example.com",
"amount": "599.00",
"currency": "SGD",
"status": "completed",
"reference_number": "ORDER123",
"payment_methods": ["wifi_card_reader"],
"created_at": "2024-05-28T14:37:11",
"updated_at": "2024-05-28T14:38:25",
"payments": [
{
"id": "9c262fb5-a1b2-4c3d-8e9f-123456789abc",
"status": "succeeded",
"currency": "sgd",
"amount": "599.00",
"refunded_amount": "0.00",
"payment_type": "card_present",
"fees": "2.50",
"created_at": "2024-05-28T14:37:11",
"updated_at": "2024-05-28T14:38:25"
}
]
}
```
### Validating the Webhook
To ensure the webhook is authentic, validate the `Hitpay-Signature` header:
```php PHP theme={"system"}
function validateWebhook($payload, $signature, $salt) {
$computedSignature = hash_hmac('sha256', $payload, $salt);
return hash_equals($computedSignature, $signature);
}
// Usage
$payload = file_get_contents('php://input');
$signature = $_SERVER['HTTP_HITPAY_SIGNATURE'];
$salt = 'your_salt_from_dashboard';
if (validateWebhook($payload, $signature, $salt)) {
$data = json_decode($payload, true);
// Process the payment confirmation
// Mark order as paid
} else {
http_response_code(401);
exit('Invalid signature');
}
```
```javascript NodeJS theme={"system"}
const crypto = require('crypto');
function validateWebhook(payload, signature, salt) {
const computedSignature = crypto
.createHmac('sha256', salt)
.update(payload)
.digest('hex');
return crypto.timingSafeEqual(
Buffer.from(computedSignature),
Buffer.from(signature)
);
}
// Usage in Express
app.post('/webhook', (req, res) => {
const payload = JSON.stringify(req.body);
const signature = req.headers['hitpay-signature'];
const salt = 'your_salt_from_dashboard';
if (validateWebhook(payload, signature, salt)) {
// Process the payment confirmation
// Mark order as paid
res.status(200).send('OK');
} else {
res.status(401).send('Invalid signature');
}
});
```
## Next Steps
Now that you understand the basics of in-person payments:
* Learn how to [handle failed payment requests](/apis/guide/in-person-payments/failed-payments)
* Get started with [testing in Sandbox](/apis/guide/in-person-payments/testing)
## FAQs
The `webhook` parameter in the payment request API is **deprecated** and will be removed in a future version.
**Why the change?**
* The new registered webhook system supports JSON payloads with richer data
* You can subscribe to multiple event types (not just payment completion)
* Centralized management from your dashboard
* Better scalability - one webhook URL handles all your payment requests
**Migration:**
1. Register your webhook URL in **Developers > Webhook Endpoints**
2. Subscribe to `payment_request.completed` event
3. Update your webhook handler to accept JSON payloads
4. Remove the `webhook` parameter from your API calls
No, these APIs only work with Wi-Fi readers.
No, you cannot connect a Bluetooth printer to the Wi-Fi terminal.
The card reader automatically detects the payment method. When you create a payment request, the reader will display a QR code first. If the customer prefers to pay with a card, they can simply insert or tap their card on the reader.
The supported QR payment methods depend on your business location and the payment networks available in your region. Common methods include PayNow (Singapore), Ingenicos (PHP), PromptPay (Thailand), and other local QR payment schemes. See the complete list of [supported QR payment methods](/apis/guide/embedded-qr-code-payments#supported-methods).
QRPH payment method is currently not supported through in-person payment request APIs
Yes, you can test in Sandbox! However, the APIs do not support a virtual simulator. To test successfully:
* **For Card Payments**: You'll need a physical test card. Contact HitPay support to obtain test cards for your region.
* **For QR Payments**: You can test with QR code payments using your mobile payment app, as these don't require physical cards.
All testing must be done with real terminals connected to the Sandbox environment. See the [Testing in Sandbox](/apis/guide/in-person-payments/testing) page for detailed instructions.